SCELBI MCMON Modified for Keyboard and Scopewriter

Down below is a link to a modified MCMON that supports SCELBI keyboard input and Scopewriter output. This monitor rewrite took a lot longer to get working than I expected. I had all kinds of issues figuring out a register and memory allocation scheme that wouldn’t bloat the code to beyond 256 bytes. In the end, I managed to squeeze it down enough so that I actually have 5 free bytes for additional features or bug fixes.

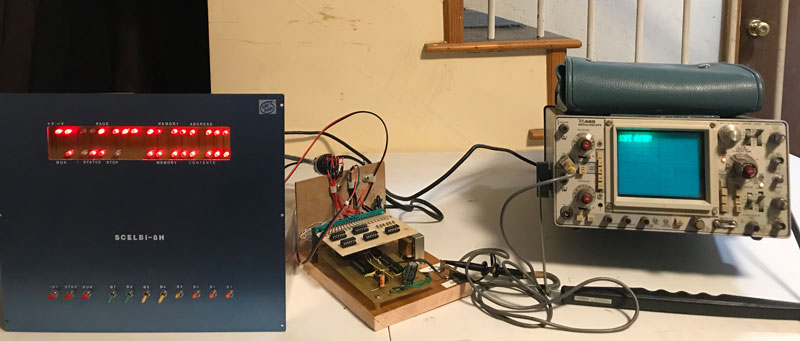
I verified this monitor is functional by first running it out of SRAM, and finally, when I thought everything was working well, I burned a 1702 EPROM. I installed the EPROM on the modified SCELBI 1K SRAM memory board which has provisions for a single 1702 EPROM. In the past, I had the serial interface version of MCMON in that spot.

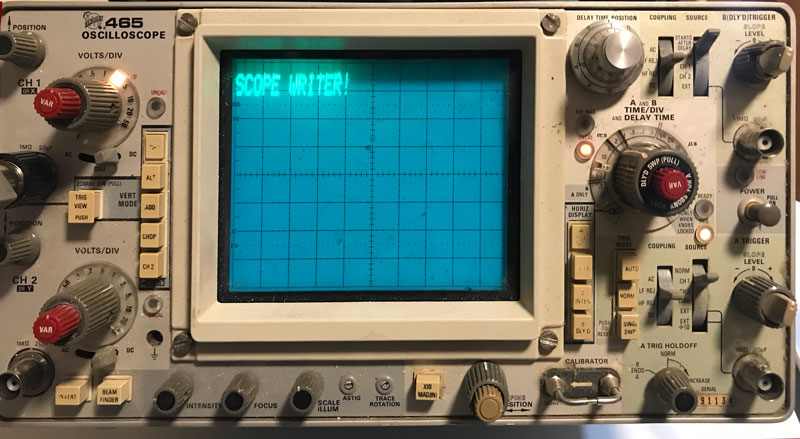
It turns out that the Scopewriter output is much easier to read than the SCELBI CRT interface. This clarity comes at cost, as it only has one line of output compared the the SCELBI CRT’s five. However, it’s pretty clear to me, that because of the vastly more complex design, that the SCELBI CRT interface couldn’t compete, once the Scopewriter came out.

I had to delete the serial bootstrap function when I ported the MCMON to the keyboard/scopewriter combination. Anyway, a keyboard bootstrap wouldn’t work that well anyway. You might as well use the built in monitor commands to load memory. Manually entering a bootstrap isn’t going to be the end of the world. I did a test by entering in the complete MCMON into one page while running it out of another page. MCMON is amazingly efficient in terms of keystrokes when it comes to reading and writing memory. I was able to successfully type in a working copy of the monitor in just a few minutes. Entering a boot loader shouldn’t be much of an issue.

One thing about these vintage computer projects, is that one project always leads to more. I now need to upgrade my OS/X SCELBI emulator to support the Scopewriter.

I’ll also need to come up some kind of demo application, that will run with only one line of output visible at a time and can run in less than 4K of memory. This will preferably be some kind of game or other entertainment mechanism. Maybe someone knows of a small version of Colossal Cave or a similar app floating around.

Oh yeah, then there is the need to put this interface in a nice project box…

Scopewriter Working With SCELBI

SCELBI ScopeWriter Setup

I had a few issues getting this set up working, but it had more to do with the fact that I hadn’t powered up my SCELBI 8H in a long time and I had forgotten how to set it up with MCMON and the serial port adapter. Once I had that all figured out, I just had to move the Scopewriter output ports from 4-7 to 0-3 and tweak the driver to reflect the changed port assignments. After that, the Scopewriter interface worked without any further problems. Well, to be honest, I did initially put a couple of the 74XX chips into the wrong sockets, but that was easily diagnosed and rectified.

SCELBI Scopewriter Output

The SCELBI-Scopewriter project has one more step. I’m going to create a modified version of MCMON that uses the Scopewriter for output and the SCELBI keyboard interface for input. This is a combination of historically available add ons. They will transform the SCELBI 8H from a very difficult to use computer to a machine that is fairly practical. If you added a cassette interface, the system ends up with pretty decent capabilities for the day. It’s true that the cassette driver would have to entered via the monitor program, but that shouldn’t take but a minute or two.

The neat thing about this, is that all this technology existed in one form or another, back in the mid 1970s. It’s true that I basically rewrote the Creed monitor for the SCELBI, but the rewrite was certainly something that was doable back in the day.

A little more about the SCELBI Scopewriter Interface

This interface is pretty simple. It uses the strobes and data bit 0 from three output ports to control the Scopewriter switches S1 through S3. It uses another strobe to load the character from the data bus into a 6 bit latch.

Scelbi Interface Schematic

I thought about how best to implement this design. I even went through the effort to create a PCB design.

SCELBI Interface PCB

In the process of creating this PCB layout, I think I found one mistake in the schematics. OS7 should be connected to pin 13 on Z5 instead of pin 4. I’ll verify this when I power up and check it out.

When I remembered that I had a perf board with a 44 pin edge connector, I decided to build the Scopewriter interface with that. I could have etched the PCB that I laid out. This design requires a two sided PCB and etching those at home is quite a fiddly process. This perf board probably would have been slightly quicker to wire using wirewrap techniques, but I didn’t have a sufficient quantity of wirewrap sockets. I was able to complete the wiring on the perf board in about a half a day. That is about the same amount of time that it would take to cut, etch and drill a custom PCB. The result is shown below.

SCELBI scopewriter interface

The interface uses 22 signal lines, which doesn’t leave room for power and ground on the same side of the edge connector. I decided to add +5 volts and ground to pins 1 and 3, on the top side. Those are the red wires in the photo.

Since I’m short on Amphenol sockets, I decided to connect three of the four strobes from the SCELBI chassis, without a full connector. I cut down and filed a finish nail so that it would fit snuggly into an Amphenol socket. Then I soldered it to the end of each wire.

SCELBI Strobe Connectors

It occurred to me that this interface could probably be redesigned to use two output ports instead of four. This can be done by latching data bits 1 and 2 with OS4, instead of using separate strobes to control S1 and S2. I decided to stay with the original design, so I could use the original software.

The build decisions were partly driven by what I had in my spare parts stash, which once again proved diverse enough to support this project without requiring any new purchases. That is a good thing.

SCELBI Scopewriter Interface

SCELBI Scopewriter Interface

This interface design is taken directly from the SCELBI Computer Digest, volume I, issue I. With the exception of the enclosure, it turns out that I had all the parts needed in my stash to build it. The dimension of the block of wood that I’m mounting this on, are set up such that it will be easy to move it into a Bud 3009-A enclosure. This is the enclosure in which most SCELBI peripherals are housed in.

It’s about ready to power up, but I’m wondering how much effort it will take to make it work. Unlike many people doing similar projects, I’m not real anxious to find out. More often that not, I’ve spent many hours trouble-shooting these kinds of designs before they could be made to work. Let’s just say that, at this point, I’m a little gun shy. I’ll most likely power it on tomorrow morning.

Scopewriter Update

I’m preparing to try interfacing my Scopewriter to a SCELBI computer.  One issue I had with the Scopewriter was the character generator.  It was designed to use a TMS2501, which I have been unable to find a source for.  A while back, I adapted a GI 2513 for the purpose, but it was kind of a hack.  A while back, a friend in Europe sent me a substitute, a TESLA MHB 2501, which he says are readily available for low prices over there.

Tesla MHB2501 in scopewriter

Tesla MHB2501 in scopewriter

This substitute works fine. Stay tuned for an future blog article describing how this interfacing project goes.

More on SCELBI

In September, I did a presentation on the history and technology of the SCELBI computer business at VCF-Midwest.  I enjoyed doing the research for that talk, and it inspired me to start writing down what I learned.  This story will be illustrated with many of the images that I have acquired over the years of researching SCELBI.

I’m about 2/3rds of the way through writing the initial draft.  As I put together this document, I am learning a lot more than I expected.  I have answered a few of the questions I had originally raised, in preparing the VCF-MW presentation.  Some other questions have been raised, but I suppose that that is how these things go.

As I started writing this story, I found it was necessary to put the SCELBI business in context with other start up businesses and hobby activities that were going on at the time.  This story is becoming almost as much, the story of the first generation of 8008 based home/hobby computers, as the story of SCELBI, itself.  I plan to have a draft to share in a month or two.

My hope that the vintage computer hobbyist or historian might enjoy this story, once I get it into shape.

Framing for City Point Engine House

City Point Engine House Frames

City Point Engine House Frames

I’ve been slowly starting to construct the frames for the City Point Engine House. At the top of this image is the queen post section of what will become an interior frame. At the bottom is one of end sections. First, I cut all the lumber to length. In order to get consistent results, I use an acetate sheet to hold the beams over a scale image of the framing while glueing together. The glue does not stick to the acetate which, once the glue drys, allows me to “peal” the acetate away from the wood frame.

iMac repair update

Back in this post from almost a year ago, I noted how I “repaired” an iMac power supply by reflowing some suspect solder joints. Well the repair lasted less than a year, when the problem returned. After attempting another go at reflowing solder joints, which had no effect, I ended up getting and installing a new supply. Hopefully the new supply lasts more than a year.