PS/2 to ASCII keyboard interface update

I spent some time last night coding up the last software features I wanted to implement for this device.

I still have to do the following before I can offer you some kits or built and tested boards.

1. test new software changes in AVR simulator
2. build a new prototype with hardware changes
3. test new software changes on new prototype with both Apple II and Apple 1
4. getting a quote on a run of production boards and cost of parts
5. figure out pricing and quantity I”ll build
6. purchasing parts and PCBs
7. writing a short instruction manual

Toughest task is building the proto board, and I have some time before the A1 PCB’s arrive in which to do that.

The original plan was to pin out the 16 pin socket for a default compatibility with the Apple II. Apple 1 users would have to cut some traces and add jumpers for the Apple 1 pin out. I am designing the board so that this will be easy to do.

As I was sitting here typing, I realized I may be able to do a soft configuration change between apple 1 and apple 2, so that no hardware cuts and jumpers would be necessary.

I guess the SW isn’t really done, after all. I’m going to have to look at what it would take to reconfigure the AVR so that cuts and jumpers become unnecessary when moving between A1 and A2. In any case, I’ll leave the option to do hardware cuts and jumpers in the HW design, in case users of other vintage gear need to configure the pinout differently.

Apple 1 update #17

This weekend I completed two small projects I needed in order to bring up the Apple 1.

First was what I am calling a power entry module (PEM). This contains the transformers, on/off switch and fuse. As this point I’m not planning on including the switch and fuse and associated wiring with the kits, since choice of components depends alot on the type of enclosure you will be housing your Apple 1 in. For initial bringup, I’ve put together the PEM, so that I don’t have exposed 110 volt wiring near the computer while I’m working on it. Eventually I plan on building a nice acrylic case for everything, but that will come later.

Note that in building this unit, I was reviewing the instructions in the Apple 1 operations manual. The diagram had the switch on one side of the AC line and the fuse on the other. Keep in mind that I’m far from an expert in this area. However, I’m thinking that this isn’t a very safe design. Common household wiring normally has 3 wires, commonly called the hot, common and ground. The hot sources the voltage and common is the return. Normally the common will be close to a ground potential. If the switch is connected to the hot wire and the fuse the common, then if the fuse blows, and the switch is left on, then there will be potential voltage in the system, just with nowhere to flow. If the reverse is done, then there will be potential voltage in the system anytime the system is plugged in, unless the fuse blows. I’m thinking that the proper way to wire this system is to put both the fuse and the switch on the “hot” wire” and then if either the fuse is blown or the switch is off, then there will not be potential voltage in the system. Please let me know if you think that I am off base here.

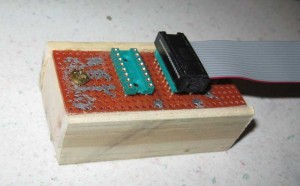
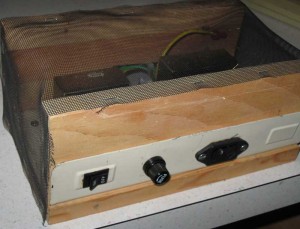
Second thing I put together is an Apple II to Apple 1 keyboard converter. This was done using a couple of spare wirewrap sockets and some perf-board, all out of the scrap box. The total cost was nil. John Calende has a nice blog describing what needs to be done.

http://apple1computer.blogspot.com/

Here is my quick and dirty wirewrapped version, mounted in a small wooden box I made from scrap wood. I’m thinking of adding a clear screen button to this converter.

Apple 1 update #16

Cameron Cooper, who has been a great asset in finding parts, is putting together a new web site called apple-1.org. We are planning some scheduled chat sessions that will be hosted from his site. The first one will be held the evening after I receive the A1 boards. Topic’s are open to Apple 1 related stuff, but I hope to post a URL to images of the PCBs boards- so this will be the first public viewing, so to speak. I’ll post the time and date for this chat session as soon as UPS gives me the date that the PCB’s will arrive. Meanwhile hop on over to Cameron’s site and get registered.

According to the status on the Advance Circuits web page, the boards are built and in the shipping department, due to ship Monday. I’m far more excited about these boards than I think I was with the rev0 boards. Could be a couple of factors at play here. First of all, this board seems to me to have been far more difficult to reverse engineer that the A2 rev 0 was. I though I would have an easier time on the A1 because of the experience of the A2rev 0, but the A1 effort turned out to be even larger. I believe that the A1 was original designed with the idea that a silk screen and possibly solder mask were expensive options, so a lot of legend information was added to the top copper layer. Also the power supply section was pretty tricky. There is more interest in this project than there was on A2 rev 0, so I think that that is adding to the excitement, as well.

While I’m waiting for the PCB and last parts to be delivered, I’ll be working on two things.

1) The A1 assembly manual.
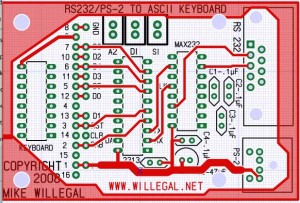
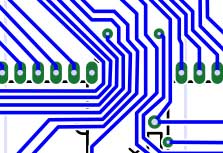
2) The PS/2 to keyboard adaptor. I’ve decided to make a batch of these. They will default to an A2 configuration, but will easily be altered to a A1 configuration, and I’ll provide instructions. Here is what the top artwork currently looks like.

Cameron and I are also investigating a possible vendor of new parallel ASCII keyboards. This same vendor was advertising in the Hobbyist magazines the 70’s and still lists ASCII keyboards with parallel interfaces in their catalog. In fact the current keyboard appears to have the same key layout as can be seen in those 1970’s era adds. Hopefully they still stock them and the price is reasonable. Original ASCII keyboards are very, very difficult to find. The only reliable source I know of, is from the Apple II+ systems that are frequently sold on ebay.

Finally, if you are interested in a A2 rev 0. kit, remember that the price is going up on Feburary 1st.

Apple 1 update #15

Well, I’ve ordered the last components I need, and also ordered a batch of PCBs!

For the past few weeks, I’ve been fine tuning the PCB, slowly improving fidelity to the original. Every few days I would find another little feature in the original, that I didn’t notice before. Almost all of these changes are cosmetic and wouldn’t affect functionality. Last cosmetic improvement was this morning. I guess I finally decided that it was close enough. To be truthful, I’ve been worried about accidentally breaking something functional. Getting boards of this size made, is very expensive and a batch of bad boards would set me back a pretty penny. I should have the PCBs within a couple of weeks. Next step will be assembling, testing and writing the assembly manual!

My waiting/interest list for kits is small, but steadily growing. If you are interested, send me a line and I’ll add you to it. If you are not an experienced electronics kit builder, or not completely comfortable with hooking up transformers to 110AC. I would recommend starting with one of Vince Briel’s A1 kits, which are significantly easier to put together for a variety of reasons. Once I get the first set of kits together, I’ll be offering them for sale, first on the list, first opportunity to buy. This should be sometime in Feburary.

In case you have been following my non-Apple 1 blog entries, the loose fuel line problem on my Malibu has been rectified and the fuel gage is operating perfectly.

Apple 1 update #14

I needed to get an update #14 out there before something bad happens.

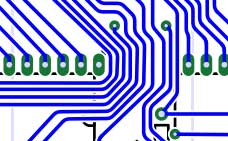
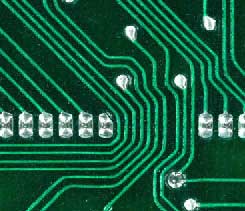
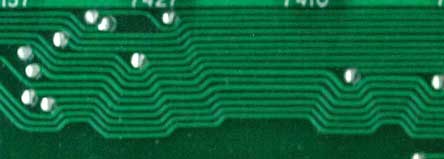
I’m declaring victory on the back and have rounded off corners on small traces. The effect is quite good. Here is a small image from the cad program and the same section from an original.

The back layer now has rounded corners on traces

The back layer now has rounded corners on traces

Here is the same section of the original

Here is the same section of the original

same section with square traces

same section with square traces

Stay tuned. I have just a few things to clean up on the front prior to declaring victory on that side.

Apple 1 update #13

I’m still working on the design reviews – I hopefully will be done by Monday or so. Found an interesting less than obvious feature a couple of days ago. Take a close look at this image.

bigtraces

Do you see something unusual?

If you don’t see it, look again. Two of the traces are just slightly thicker than the others. At first when I was working on this project, I thought the variation was just some random variation. The reality is that those extra wide traces are carrying +12 volts and -!2 volts power around the board and are made intentionally wider than signal traces.

Apple 1 Update

Still gathering parts – and emptying my bank account. Hopefully, by the end of next week I’ll have everything but a few commonly available parts in hand. I’ve also borrowed a cassette interface PCB, which I will need to build up in order to test the expansion port. I have a parts list for the cassette interface and will order those parts along with the last parts for the motherboard.

I keep finding little discrepancies between my PCB layout and the original. One recent example is on the silk screen under the power and video connectors. Based on the Apple II, I assumed that there was a silk screened box around the holes for those connectors. However I found an image of an original board that does not have those connectors installed. Sure enough, there is no silk screened box around those connectors. These sorts of changes are easy to make once the difference is discovered, but determining how the hidden portions of the original board looks, can be difficult, if not impossible. I’d part with a bit of money to get a hold of a good X-ray of an original Apple1.

Close to Declaring Victory on Apple 1 PCB layout

I’m running out of things to fix or improve on the PCB layout. I’m about to round off corners of small traces. I’m doing that last since once I do the rounding off, tweaking trace placement becomes a whole lot more difficult. Also in the plans is complete netlist check to make sure I haven’t botched some connection and run another pass of the CAD programs design checks.