Operating an Original SCELBI 8B

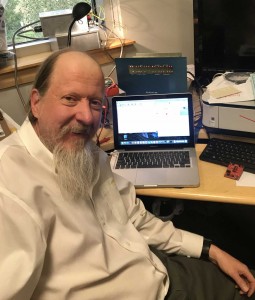
I recently spent a few hours with Mark Arnold and his original SCELBI 8B. This is the very machine that Mark used to develop SCELBAL with, way back, in 1975. Towards the end of our debug session, we had the machine in a largely working order!

Mark Arnold with his SCELBI-8B

Mark Arnold with his SCELBI-8B

We spent a lot of time, troubleshooting what appeared to be an intermittent EPROM issue. Finally we discovered that that the edge connector on the EPROM board wasn’t making reliable contact with the connector. After examining the board in detail, we noticed tarnish on the edge connector contacts. We used a soft pencil eraser to clean the tarnish off of the contacts and the intermittent operation completely disappeared. Fixing a computer with a pencil eraser was a first for me, though I expect others have done the same. Once the repair was done, Mark was able to reliably run a variety of MEA operations without any problems.

With only 4K of SRAM installed, we were unable to load the full floating point SCELBAL, but we were able to load tiny SCELBAL using a simple bit-banged RS232 port. Once loaded, Mark successfully entered and ran some small BASIC programs. Weeks later, I understand that Mark still has the system powered on and it responds to MEA commands, without any need to reset or reboot.

In order to declare that the machine is in 100% working order, a few things still need to be checked out. We had only 4K of SRAM installed, the other 8K should be added back into the system. We used a modified version of MEA with the page 76 EPROM changed. I created a version of page 76 EPROM with a 2400 baud driver, but we were having some issue with corrupted serial output characters. We don’t know if that was a ground loop problem or a baud rate problem with the modified page 76 driver. Serial input at 2400 is working perfectly, but the timing for output is done differently, so it could be either.

Finally, the cassette interface needs to be connected and tried out. I don’t really expect any issues with that, as I have used that particular cassette interface with a reproduction SCELBI 8B, back when I was first troubleshooting my reproduction cassette interface.

Reproduction SCELBI 8B demonstrated at the Museum Of Computing History (UK)

I just received this report from David Williams in the UK.

Hi Mike,

Just thought I’d drop you an email to let you know, I took my SCELBI 8B to the Retro Computer Festival at the Museum Of Computing History last weekend. Only a handful of people recognised the system initially but hopefully a few more people are now aware of the history behind the machine.

I spent a good while describing the system to one chap who I later discovered is the guy heading up the EDSAC replica build at Bletchly Park.

I was able to demonstrate the basics of the system using the monitor program to edit & display memory along with entering short programs. I couldn’t get SCELBAL to load due to a RAM fault (Only Identified when I got back home) which was a shame.

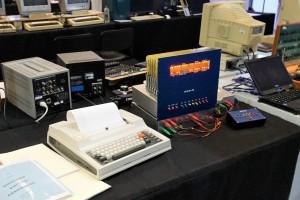
I’ve attached a photo of the setup. Terminal being used is a TI Silent 745. The box below the SCELBI is the power supply, Teletype interface to the right and a fast-load box as described in issue 1 & 2 of the SCELBI newsletters.

Cheers,
Dave

David William's 8B (reproduction)

David William’s 8B (reproduction)

SCELBI 8H Usability Reasessment

For a long time, I would say that the SCELBI 8H was the first practical computer marketed to the general public. The key word being practical, as certainly many of the other personal computers of the day, were not very useful machines, other than for educational purposes, at least without adding additional capabilities to them.

From the time that I got my reproduction SCELBI 8H working, I’ve been able to demonstrate a number of interesting, practical applications on it. That I was able to do so, was justification for the claim that a SCELBI 8H was a “practical” computer. However, I’ve always used a second computer to assemble the source code and then downloaded the application to the SCELBI through a serial port. A few months ago, when I talked to Bob Findley, I asked about how they did application development for the SCELBI 8H. It turns out that Bob and Nat used almost exactly the same approach that I used. Only thing is that they used a PDP-8 as a platform for the cross assembler and a teletype with it’s paper tape punch/reader to download the program to the SCELBI. Though the cross development platforms are different, what Bob and Nat did, was essentially the same as what I’ve done.

I’ve come to realize that though you can run some interesting, practical applications on the SCELBI 8H, it really can’t do it, without either help from a host computer, an impractical amount of time, or the addition of features like a built in monitor. After talking to Bob, and thinking about it a bit, I guess I’m ready to say that though the SCELBI 8H, as shipped, can run practical applications, it was not a very practical stand alone computer. However, that still doesn’t remove the significance of the SCELBI 8H as the first offering from one of the very first personal computer startup type companies.

Note that the limited capabilities of the 8H were recognized by Nat and Bob, who developed the follow on SCELBI 8B, with it’s extensive built in software suite. More about the 8B in a follow on post.

How Many SCELBI’s Were Really Sold?

According to Bob Findley, whom I spoke to earlier this year, the often quoted number of 200, is an exageration. Bob said they sold more than 40 completed systems and over 100 board sets.

One interesting thing that Bob said, is that until the Altair came to market, they felt that they had the market to themselves. The Mark-8 wasn’t considered a competitor, as it wasn’t sold as a functional system.

I also found out why there are so few Oscilloscope interfaces remaining (only one is known to exist at the CHM). Bob said that they only sold about 4 of them.

More information from Bob in a follow up post.

ENIAC in Action Book Review

First of all, let me tell you that I’ve had a hard time writing this review, as I enjoyed reading the book quite a bit, but I think that the book is not for everyone. I really wanted to write that everyone should read this book, as the reader will learn a lot about what happens in new product development, which is more relevant these days, than ever.

Anyway here goes the rest of my attempt of a review.

Eniac in Action by Thomas Haigh, Mark Priestley and Crispin Rope is a different kind of book in some ways. First off, it goes into a significant amount of technical detail. Much of this detail would be hard for a “lay” reader to understand. This is the part that I think may cause problems with some readers. Technical detail aside, where the book really shines is how it describes in detail, the process that it took to create, maintain and eventually enhance ENIAC, a fairly complex implementation of a new technology.

The development of ENIAC was filled with many challenges and obstacles, which the authors describe in a very engaging style. The details of ENIAC development are unique. However, in my opinion, when compared to the process of developmenting other complex systems, there isn’t much that is really different about the ENIAC. That is why I think everyone should read this book. You will get an understanding of just how hard it is to “change the world” with revolutionary new products and systems. Development of complex, new systems are always problematic and take time to sort out. Certain people in the process will get most of the credit and many, many people will be forgotten.

Reading ENIAC in Action will give you a glimpse of one such project. When reading it, keep in mind that there are many engineering teams around the world currently engaged in similiarly daunting tasks.

Early Draft SCELBI HW Construction Manual Available

This is a very early draft. Consider it to be full of errors, so compare to original documents that can be found at scelbi.com, before using. The main reason I’m posting this, is that I have created and added a couple of chapters for assembly of the oscilloscope interface. Any original documentation that existed about the oscilloscope interface has been lost. I still need to create a chapter with technical information on the oscilloscope interface, including a bill of materials, schematics and theory of operation, but this is a good start. I also need to add a section on PCB rework for this interface. The other chapters will also get revised, as I find time, with photographs of the boards and any notes or errata that I have discovered.

http://www.willegal.net/scelbi/8BHhardwarebook.pdf

SCELBI Front Panel redo in progress

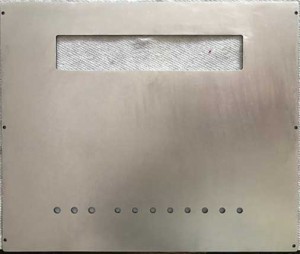
SCELBI Front Panel

SCELBI Front Panel

This SCELBI front panel had some issues, so I decided to remove the existing anodizing, polish out the defects and completely redo it. Removing the anodizing took about an hour. There is a term, “hard anodizing”, and I found out why. It was clear that the anodizing clearly made the surface extra hard. I still need to go over this panel and remove any remaining imperfections before redoing the anodizing. I have a few more panels that I will need to polish out, before taking the batch back to the anodizer for the redo.

A CHM Youtube Video Worth Watching

The CHM’s youtube channel has this video, which caught my attention.

https://www.youtube.com/watch?v=3Z8XrC3kLJM&index=8&list=PLQsxaNhYv8dZMhpT8-934UPMdtho7G2_W

I’ve always been an advocate for the behind the scenes “little guy” that do 90% of the work that really make new products possible. My mom taught me, when I was little, that “words are cheap”. The same can be said for the new ideas that lead to breakthroughs in technology. There is always a foundation for these new ideas and they usually aren’t giant leaps, by themselves, but almost always, incremental steps in understanding.

In my mind, the hard part, isn’t coming up with the idea, but implementing it. In fact, many products are described decades before they can be implemented.

The stories on Andy Hertzfeld’s folklore.org website, demonstrate the hard work that goes into implementation, as well as anything that I’ve ever seen. The thing to understand is that the effort that went into making Macintosh, isn’t unique, but rather the norm for almost all of the gadgets that we take for granted, these days. How do I know this, you may ask? Well, I’ve been involved in new product development for something like 38 years. Some of the products that I have worked on have been failures, but many of them, successful. In either case, it’s always a struggle for those involved. A rewarding struggle when it goes right, but still a struggle.

It seems Thomas Haigh understands this. I’ve ordered his book on Eniac and will write a review after I read it.

Thomas’ comments on Isaacson’s book “The Inovators”, made me pull out Isaacson’s book, “Jobs” and review the sections on Apple 1 and Apple II. I think I understand those products and what went into making them, very well. Thomas’ comments made me want to review the book for faults. I knew that Isaacson had Job’s and Wozniak soldering Apple 1’s, which was incorrect, but wondered what else I would find, if I reviewed those sections. Before I comment on what I found, I will say that I greatly respect anyone that can write such an engaging book, as I don’t have the patience or talent to do it.

Here are the mistakes I managed to find during a quick review of those sections.

  • Page 62: The guy who drew the up the circuit boards didn’t work at Atari. His name was Howard Canton, and he was an independent consultant, who did contract work for Atari and other companies in the valley.
  • Page 67: Woz and the gang didn’t solder Apple 1’s. They were wave soldered in a factory. Assembling the boards really meant stuffing the chips into the factory soldered boards. Daniel Kottke tested the boards, and if they failed, put the failing board in a “bone pile”, that Woz would debug during occasional visits to the Job’s home.
  • Though there are no real mistakes with the Apple II section, there are, in my mind, serious omissions.

  • Page 74: The real problem with the first Apple II PCB layout, was that Howard Canton, instead of doing it himself, had hired someone to do the layout, and that person did a horrible job. The layout was redone digitally, which took, if I remember right, three months.
  • The first Apple II PCB’s didn’t work, do to noise on the address lines that were connected to the DRAM. Rod Holt fixed the problem by adding termination resistors to those lines. This fix was more important than the implementation of a switching power supply. By the time the Apple II was released, switching power supplies had already been in use for 6 or 7 years. In any case, I doubt that use of a linear or switching power supply would have made a great deal of difference in the success or failure of the Apple II. Proof of this, is that the switching power supply is only mentioned in the first Apple II sales brochure, as a one liner in the last page’s technical overview section.
  • Allen Baum had a significant role in developing the monitor for the Apple II, which is not mentioned.
  • Page 84: Though Apple had venture funding, the company was on very shaky financial ground through it’s first year or two. It was not an instant success.
  • In scanning this section, I could find no mention of the Disk II, floppy disk interface. This was a critical item that enabled the success of the Apple II.
  • I understand why Isaacson, in his story, emphasized Job’s interaction with a number of significant personalities. It is a shame that the struggle to develop a new product by a team of talented engineers gets so little “ink”. I also wonder how accurate the depictions of the interactions between the significant personalities really is. It seems that, in terms of the technical stuff that I understand pretty well, Isaacson would grab a fact and elaborate upon it, kind of putting his spin on it, without doing serious fact checking.

    In any case, it’s an entertaining read, that I recommend, in spite of the errors and omissions.

    New (old) Keyboard Design

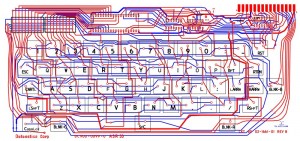
    Keyboard Layout

    Keyboard Layout

    Here is the current state of my new parallel ASCII keyboard layout. It is setup to use Cherry key switches and the encoder is a 40 pin AVR micro controller. I plan on making the encoder/controller key mapping configurable through the keyboard itself. It should work nicely as an Apple II/IIplus replacement keyboard, an Apple 1 keyboard, or a more generic ASCII parallel keyboard. The strobe will be configurable as a pulse with configurable duration, requiring an ack, or simply follows state of keypresses. The later mode will only keep strobe active and data output valid while a key is pressed. Like Wendell Sander’s design, the power light doubles as a caps lock key. Note that I plan on making the power/caps lock light configurable to indicate general power/health or caps lock status.

    Due to making configuration through keypresses, most of the solder jumper locations will go away, but I might need to leave the reset option in the layout. I still have a lot of work to do around the micro-controller section plus a lot of design verification. I also intend to retro-ize the traces to make them look more like a hand laid layout that could have been done back in the 70’s.

    In keeping with the original Datanetics rev D., upon which this is based, I may leave out the silk screen layer on the final PCB.

    New SCELBI 8B Video

    The following link will lead you to a video showing off many of the components of a SCELBI 8B with audio tape, keyboard and oscilloscope interface. It starts with a description of each individual module. Then the components are all “hooked up”. The systems is powered up and some of the capabilities of the SCELBI system are demonstrated.

    http://www.willegal.net/SCELBI-8B.mov