The shutter tester application has 3 global controls and 5 screens.
The global controls are at the bottom of the screen:
- Monitoring Tester
Each Screen Provides Different Interpretation of Captured Data:
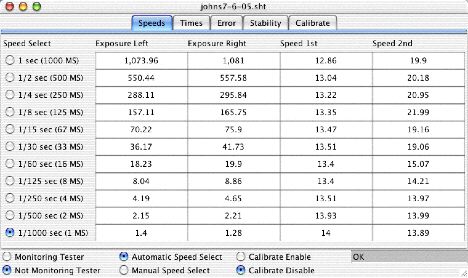
- Speeds
- Times
- Error
- Stability
Shutter Tester Application Notes
The shutter tester application has 3 global controls and 5 screens.
The global controls are at the bottom of the screen:
- switches captures of shutter events on and off. When off, “Not Monitoring Tester”, no new events are captured. When on, “Monitoring Tester”, all new capture data is propagated to the programs controlling the 5 screens. Each screen interprets the data according to it’s own needs.
Each Screen Provides Different Interpretation of Captured Data:
- Provides exposure time and shutter speeds for focal plane shutters in milliseconds. The shutter speeds are time required for shutter to traverse between the two sensors. Actual shutter speed depends on distance between sensors for your particular sensor design.
- Provides exposure time in fractions of a second. For example 716 is equal to 1/716 of a second. At speeds slower than 1/30 of a second, it would be preferable to use the Speeds display because of rounding error. The shutter speeds data is the same as that of the speeds screen.
- Ratio between the best case result and actual. For example if the optimal result is 1/1000 and the actual is 1/750, 1/1000/1/750 = 1.33. This shows over exposure by 1/3 stop at that speed. The shutter speeds display is( actual shutter speed *2)/13.75 and probably should be ignored.
- Keeps track of up to the last 4 captures for each speed. The displayed value is the difference between the smallest and largest of these last 4 captures in milliseconds. Reading a saved file is equivalent to making a new capture. This allows you to track changes in your camera’s perfomance over time. Simply capture shutter performance and then save the file. Later on when you test the camera again, first read the old data, then test the camera or visa versa. The stability screen will give you the difference between the old performance and the new performance. Reading several old files is equivalent to making several captures. You also may want to read and save the settings before tuning up the camera and again afterward to see the changes in performance that you have effected.