SRT Shutter Tuneup Notes
Disclaimer
I will not be held responsible for any damage that results from you
looking at or following these notes. If you don't feel comfortable goofing
around with this stuff or the possibility that you could damage something
on your camera, just don't do it.

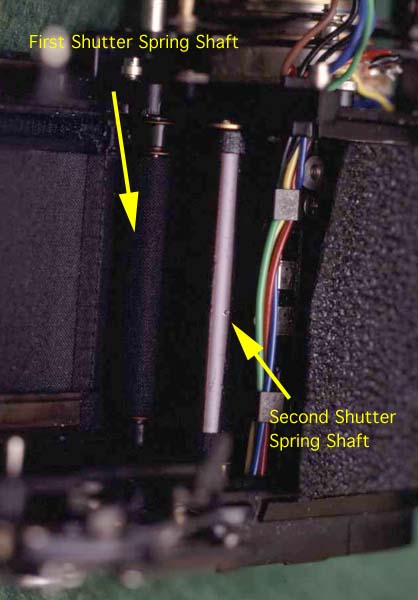
Deep inside my SRT101, note the shutter curtain spring shafts. The
hole I drilled for lubricating one of these shafts can clearly be seen at
the arrow head.
First Clean and Lube your Shutter
It is best that you clean and lube your shutter prior to adjusting
it. If you don't, you may be putting excess tension on the springs that
operate your shutter, in order to overcome friction to achieve proper shutter
speed. This is not a trivial task on a Minolta SRT cameras, as the viewfinder
and mirror box must be removed to access the cylinders that contain the SRT
shutter springs. I have exchanged some emails on the subject with veteran
camera repairman Vincent Fairbrother who reports on how to actually lube
the shutter springs that are enclosed in hollow cylinders.
"Mike, One of the problems in repairing an SRT, is that commonly the
shutter curtain springs are simply dried out and there is no way to get
lube inside of the tubes they are in. I have found a simple method which
Minolta will never say anything about in their service manual, because
they were not servicing cameras that were nearly 35 years old. Take a very
fine drill(080, or 1 mm) and put it in a pin vise. Dip it into a bit of
oil, and carefully drill a hole by hand in the center part of both tubes,
being careful to recover the chips, and not puncture too deeply, damaging
the springs. Then with a hypodermic filled with oil, lube those babies,
and if you have some compressed air blow into the holes to spread the oil
over the springs(Be generous with the oil.) When things start working properly
again, fill and seal the holes with some wax from one of those furniture/appliance
touch-up sticks to prevent the oil from running out, and then clean up the
area with your choice of solvent(Napha). This is a more permanent solution
to most shutters that lack enough oomph to fully trip themselves, rather
than adding too much tension on unlubricated springs. This trick can be used
on almost any focal plane shutter that uses those type of sealed barrels
to contain the curtain springs. Good Luck!!! "
Vincent reports that he learned this technique from an elderly Japanese
technician from the Nikon factory in Tokyo while he was working for Ehrenreich
Photo Optical way back in 1964.
I have now tried this on one junk camera, that I bought expressly for the
purpose. At this point, I'm unsure of the results. In any case,
don't use too much oil, as it will come out the ends of the shaft and end
up everywhere inside your camera. Also drilling a hole in the first
shutter, was a bit of a challenge for me. I ended up drilling right
through the curtain, although now that I think about it, you may be able
to avoid this by simply releasing the spring, though I didn't think about
it at the time.
If the winding mechanism seems smooth, and lubrication of the shutter
gears on top of the camera helps get the speeds back into shape, I would
leave well enough alone. Overall, this is an involved task that should
be appoached with caution by novice camera repair people. If you
do decide to try this, you can get hyperdermic needles from Micro-Tools for
only a few bucks. For the 25 gauge size, use a number 76 or 77 sized
drill bit. You should be able to get these small drills and drill
bits at most hobby stores.
Shutter and Winding Gear lubrication
I spent a considerable amount of time with that same camera, trying
to get the winding mechanism to work smoothly. Cleaning with large amounts
of Naptha did nothing, although when the Naptha was in place, it smoothed
out a bit. Eventually the Naptha would evaporate and the winding mechanism
would become unbelievably hard to work. No amount of light oil (Nyoil)
had any significant effect. Eventually I resorted to using small amounts
of a fairly light grease intended for racing bicyles bearings and things
smoothed out considerably. It's still not as smooth as my other SRT's.
I kept this grease away from the the slow speed timing mechanism. If
anyone has any better suggestions, I'm open to try them.
Next, Adjust Shutter Timing
Once lubed, adjusting the shutter speeds of your SRT is not that difficult
if you are used to tinkering with small mechanical devices and take your
time. You must have a shutter speed tester that can measure exposure times
as well as shutter speed of focal plane shutters. Also you should obtain
a copy of a SRT service manual.
Tune It Up

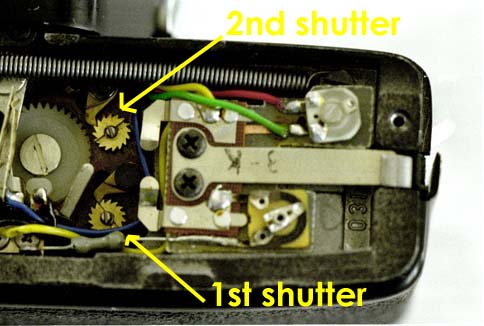
Figure 1. 1st and 2nd shutter tension adjustment gears
Here are the instructions in the srt service manual with my notes. I believe
that perfection is not possible and not necessary. For instance it appears
that the speed of the 2nd shutter curtain varies depending upon whether
the 1st shutter curtain is moving at the same time as the 2nd shutter curtain
or not.
- Remove top and bottom covers (see disassembly page).
- Measure the shutter velocity at 1/60 sec. Adjust by means of the
second shutter curtain spring so as to obtain the curtain time from 13.5
to 14 milliseconds.
- What you want to adjust is the time that the second shutter takes
to cross the focal plane. The second shutter is the shutter that ends
the exposure. The shutter velocity is controlled by adjusting the spring
tension of the second shutter spring. The adjustment is made by rotating
the gear identified as "2nd shutter" as shown in figure 1. Increasing
speed is accomplished by increasing tension on the spring by rotating
the gear counter clockwise. Decreasing speed is accomplished by carefully
releasing pawl while simultaneously holding the gear in position so it
doesn't completely unwind. Rotate the gear manually and reengage the pawl
before releasing the gear. Don't worry too much about perfection at this
stage as you will have to fine tune the speed a couple of steps later.
- Adjust the forward and backward openings by the spring of the first
shutter curtain.
- Basically repeat the previous step on the first shutter. Note
that very small changes of 1 or 2 gear teeth in tension will have affect
on the speed, so work carefully with minor adjustments.

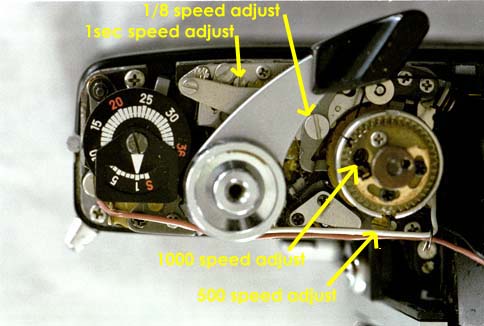
figure 2. Shutter speed adjustment screw locations
- Measure the shutter speed at 1/500 sec. Adjust the shutter speed
by means of the eccentric pin.
- All the speed adjustment screws are very, very sensitive to even
very minor tweaks. Attempt to tune with very small movements. If the basic
shutter speed is not already fairly close to ideal settings you most likely
have trouble getting the results you are looking for., See the figure
2 to identity the various adjustment screws.
- Measure the shutter speed at 1/1000 sec. Adjust the shutter speed
through the hole of the shutter dial and also confirm the shutter curtain
velocity variation.
- The shutter speed needs to be close to ideal to get good results
at 1/1000 sec. At this point you should carefully fine tune shutter speed
to make sure exposure at 1/1000 sec is the same on both the left and right
sides of the film plane. Note that the 1/1000 screw adjustment is
pretty much independant of the 1/500. I have found that you don't need
to worry too much about having exact exposures at 1/60 on both sides of
the frame, but at 1/1000 you want to get it as even as possible to ensure
even exposure across the picture.
- Also check the shutter speed at 1/250 sec., 1/125 sec, 1/4 sec
and 1/15 sec.
- You can't directly adjust these speeds, but they are affected
by shutter speed, and the 1/500 and 1/1000 adjustment screws. If the shutter
speed and speeds at 1/500 and 1/1000 are close you should have no significant
problems at these speeds.
- Measure the shutter speed at 1/8 sec. Adjust the slow adjustment
eccentric pin of the slow governor.
- Minor movements of this screw has a significant affect.
- Also check the shutter speed at 1 sec., 1/2 sec., 1/4 sec. and
1/15 sec.
- Measure the shutter speed at 1/30 sec. Adjust the split pin of
the slow speed cam.
- I haven't had to change this setting, and don't know how you
would accomplish it.
Back to Mike's
Hobby Home Page


