Mike's Minolta SRT Repairs Page
I will not be held responsible for any damage that results from you looking
at or following these ideas and designs. If you don't feel comfortable
goofing around with this stuff or the possibility that you could damage
something on your camera, just don't do it. Some of these repairs can
be attempted without a Minolta SRT service manual, but I recommend spending
the 12 dollars or so to get one. The descriptions and procedures in that
manual should be followed, and I only will attempt to amplify or clarify
some not so obvious points on this web site.
See the section on the tools you
might need before attempting the repairs.
Mirror doesn't return after taking picture

Mirror doesn't return after taking picture - it does return after
cocking camera for next picture.
The root cause for this problem most likely is that the second shutter
curtain is not completely closing or that it is not closing with enough
force to trigger the mirror release. First diagnose the problem.
- Remove the bottom cover of the camera. This is easily accomplished
by unscrewing the two screws. See note about the screws on this camera
in the tools page . After that
you should be able to slide the cover off.
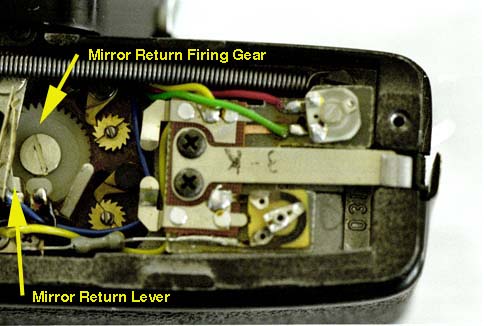
- Take a picture. If the mirror does not return, manually engage
the mirror return mechanism by pressing on the lever that the wheel would
normally hit. See picture.
- If the mirror does return, you have this problem. If not, you
have some other issue and should elsewhere for answers.
To be specific, the gear that spins and hits the mirror return mechanism
is not hitting it with enough force to cause the mirror return mechanism
to engage. This is the white gear in the picture. Note that it
has a knob on it that hits the mirror return mechanism after the shutter
fires.
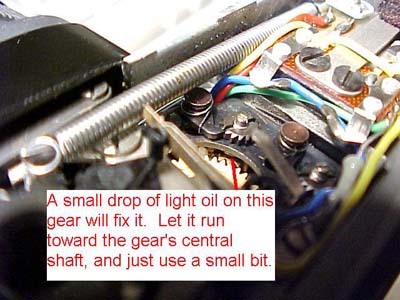
You might just have a lubrication problem. Jon Goodman has provided
the following picture that shows which gear to lubricate to folks on the
Yahoo camera-fix group. This is the gear hidden by the plate, not the
plastic firing gear. This simple fix has worked for a number of folks
belonging to this group.
One version of this problem, I've seen, is the second shutter curtain
hanging up on the first curtain, just at the end of it's run. Fixing
this required taking out the mirror box and straightening out the lathe
on the shutter curtain.
The hack described next has also worked as a temporary repair for me.
Your mileage may vary. At this point, a true fix might involve removal
of the mirror box assembly and then cleaning and lubricating the shutter
bearings or finding whatever is binding and preventing the shutter from
completing it's run.
- Be careful as you work on this as you don't want loose
screws wandering around the inside of your camera.
- First make sure your camera in NOT cocked.
- Then, unscrew the screw holding the mirror return firing gear
on.
- Then adjust the position of the knob (with the stutter NOT
cocked) right up to the mirror return level. Your best bet is too try
to do this in place without taking the gear out of the camera, as it might
be a bit tricky to get back in place.
- Tighten the screw back down and try your camera again.
Mirror/Camera back foam replacement
There are several places on this camera that have foam that
deteriorates over time. There is a downloadable write
up for this procedure on the Micro-Tools website, which you can use
as a guide. I use isopropyl alcohol, wooden scewers and
Q-tips to clean the old foam out prior to attaching the new.
I like using the wooden skewers because they are fairly soft and easy on
the finish.
- Groves in which back is seated: Use 1 mm
thickness. You only need to open back. Cutting the
foam and getting it into the the seats is a challenge.
- Mirror shock absorber: Use 2 or 3 mm thickness.
Only removal of lens is necessary.
- Under top cover: Use 1mm thickness.
You need to remove top cover.
- Seal around viewfinder: Use 1mm thickness.
You must remove top and viewfinder which is fairly time consuming.
- Bottom of mirror box: Use 3mm thickness.
You must remove top, viewfinder and mirror box- very time
consuming and is not for the faint of heart.
Jon Goodman has provided detailed instructions for SRT foam replacement
in this downloadable pdf file. He
also sells foam kit under the seller name interslice on ebay.
Shutter closes right away in B mode, even when shutter button is held
down
This is possible to fix, but takes some patience and care
to avoid creating worse problems. Under construction.
The meter doesn't work or is flakey
Likely causes of problems include:
- A stuck needle - the needle may stick to the old
and sticky foam that was used in construction. My original
camera took a rap on the side of the camera to free up the needle. This
lasted for a couple of years. Eventually the foam totally dried
out and it didn't need the rap anymore. You will probably have to
take the camera apart to get yours working again.

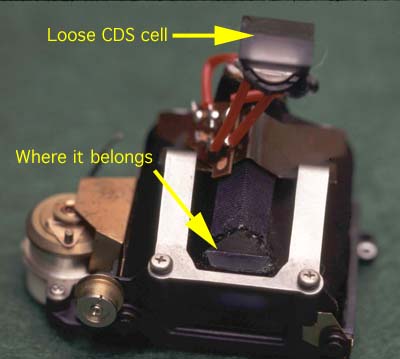
- CDS sensors that come loose from the viewfinder prism
- they must be reglued with clear glue. It may not
be obvious that they are lose at first glance, but remember that they are
glued to the prism and there should be no play between the cells and the
prism. I recently ran across one of these. I cleaned the surfaces
to be bonded with 91% isopropal alchohol and Q-tips. The surface
doesn't clean to a shiney state, but a matt state, as can be seen in the
photo, above. When mated with glue, the interface then becomes transparent.
I used Dupont clear epoxy purchased from a nearby department store.
If you remove the focusing screen from the bottom of the viewfinder,
you can see how well the cell is mated with the viewfinder. In my
case the fix wasn't perfect, but qualified as good enough for my purposes.
Note that I'm not sure I can try again, anyway, since the epoxy has
long since set.
- Strings that have come loose - simply must be restrung.
When stringing work from the bottom up. Start with the
aperture sting. Then do the speed/ASA sting. See the reassembly
page for more details on strings and restringing.
- Aperture full open switch is shorted out on aperture
follower pulley. The switch must be adjusted.
- Debug meter problems with an ohm meter. Try different amounts
of light and see if the resistance across the CDS cell changes. Check
for shorts and opens with the ohm meter, as well. A basic knowledge
of electronics helps considerably.
The focus screen is fogged
- The focus screen is made of a soft plastic. It
is easily damaged by solvents, which may fog the focus screen just through
contact with vapor from solvent used in the proximity. This particular
repair is a last ditch strategy. You should try this only if the
focus screen can't be cleaned through normal methods, such as soap and water.
Once fogged, it is almost impossible to completely fix, but I
have been able to get one into good enough shape to be usable again.
- I used a variable speed Dremel like rotary tool on the slowest
speed and a cloth polishing tool. I melted the focus screen in
a couple of places, but cleared the haze out enough that it is pretty useable.
You must work very lightly and slowly or you will end up melting
the plastic like I did. Don't hold the bit in one place for very
long or you will melt the focus scren in that spot instead of removing
the haze there.
Aperture follower ring binds - doesn't rotate freely.
- Either it is dirty or something is bent.
- Lubrication is not needed on these components.
- Clean with soap and water while disassembled from the
body.
- If the washer is bent, you must straighten it so that
it lies perfect flat.
- If the coupling ring is bent out of round, you must
get it back into round. This is not easy, but mount it onto the
cover and wiggle it to see which sides have play. The other sides
are probably tight. Squeeze softly in on the sides that have
play or push out a bit on the sides that are tight till it slides smoothly
with very little friction in the cover. Softly is the key word
here.
Loose strap mount lugs
- Take the top off of the camera and tighten the screws
in the top front corners of the body.
Back to
Mike's Hobby Home Page


