Information Appliance Inc. and the SwyftCard
Introduction
In the early 1980s, Jef Raskin
was at Apple Computer, leading a low cost appliance computer project called “Macintosh”.
Steve Jobs took over the project and moved it in a different direction. Jef
left Apple and helped found a company called Information Appliance, Inc. The
first product was the SwyftCard. It plugged into an Apple IIe and it
transformed it into a Swyft Computer. The software was centered on a word
processor application, which had access to the Applesoft programming language. It also included printing and communications
capabilities built in. Information Appliance, Inc, later came out with the
Swyft Computer, which ran an evolved version of the SwyftCard software. The design was licensed to Canon – which
released it as the Canon Cat.
I don’t think that there is a better
way to describe the SwyftCard, than reprint the introduction from the original
SwyftCard manual. Also, the leaders of
Information Appliance, Inc. were very concerned about providing credit to the
contributors to the design. In the
spirit of this and also to help provide additional background and history, I’m
also reprinting the introduction and the credits page from the original
manual. The text of the next few paragraphs
are copied from the original SwyftCard User/Reference manual.
SwyftCard Meets Apple IIe
When you plug the SwyftCard
into Slot 3 in the interior of your Apple IIe and turn on the power, your
computer will be ready to help you.
- Produce written material
- Store and find information (information retrieval)
- Do arithmetic
- Write short programs, and, if you have a modem
- Send and receive information over the phonelines
- You will not have to remove your SwyftCard in order to run most Apple software.
SwyftCard is Not Just a Word Processor
If it seems that it is, that’s
because nearly everything you do with a computer consists of typing to it and
having it type back at you. With the exception
of graphic or audible output, everything done with a computer is some form of
word processing. Much of the manual explains methods of typing and modifying
text. This is a useful tool in its own
right. But, as you can see from the list
above, you can – without leaving the editor – do calculations and (if you are
so inclined) write programs; you can communicate with other SwyftCards,
computer bulletin boards and commercial data services; and you can move
information to and from and among disks.
SwyftCard is perfect for
instantly retrieving correspondence, names, addresses, and telephone
numbers. You can, for example, find a
name anywhere in your text in the blink of an eye. The same goes for a phrase, a word, or a part
of a word. And it doesn’t matter to SwyftCard
whether your text is neatly organized or a disorganized mess.
Credits
Movies
have the fine tradition of giving credit (or blame, in the case of some) to
nearly everybody who worked on the project.We can do no less:
David
Alzonfon wrote, tested and edited the manuals and on the on-line tutorial. Paul Baker honcho’d the parts and circuit
boards through production. Steve
Bowling, the president of the company, did what a president does (a lot). His assistant Patti Okoniewski manages to be
helping everywhere at once.
Terry
Holmes did the initial internal software design and the actual programming of
the early versions of SwyftCard, and insisted on making everything run as fast
as possible. Richard Krause designed the
labels and did manufacturing coordination; Jonathan Sand transformed the prototype
software into the final product, adding features and fine-tuning. Dr. David Lavond programmed during the final
phase and completed the documentation.
Jim
Straus (who banished the company picnic and substituted an annual gourmet
lobster feast - not at company expense) and Mino Taoyama* contributed much to
design and debugging; Mino’s main contributions were the hardware design of the
SwyftCard itself, and the design and implementation of the internal disk
routines and ProDOS converter.
Ralph Voorhees*, while mainly working on other projects, kept reminding us that our
customers will not put up with the usual computer nonsense; Sharmon Scipio* kept
the paychecks coming and the books in order; John Burmgarner* did some coding of the early versions and was a
constant source of inspiration, as was he ever-effervescent Scott Kim.
Collaborators who are not currently employees included Dr. Ren Curry, Brian Howard*; and
Michael Raskin, who helped early on with the design and human factors
testing. Ren’s contribution to the
cursor design was especially noteworthy. Deb Clifford worked on the early versions of the on-line tutorial; Charlie
Springer contributed his technical know-how, and Cerafin Castillo was our electronics
tech; Ron Genise* did testing and teacher training. For a time Mike Scott, Sonya Hoag, Claire Llewelyn,
Bana Witt, Camillo Santomero, and Tina Bracewell ably assisted us. Bruce Cooper extensively tested an early
prototype in a publication environment and provided helpful
suggestions about
formatting.
Mike Ivanitsky and Kevin Thurber tested printers, and Suzanne West of West and Moravec
did the graphics.
A company is fueled by the money of its investors: we thank them all. The company would not have been possible
without the legal advice of James E. Lewis* and the work of corporate secretary
Linda Blum*. We also thank Gayla Newsome
of Orange Micro in Santa Clara for allowing us to test the printer set-ups.
A special note of gratitude is extended to the many people who tested our
systems, and to the San Jose and Fremont School Districts for letting us test
SwyftCard in an educational environment.
The company grew from discussions between Dr. James Winter* who invented the DISK
command and contributed greatly to the design and the implementation of the
software, and Jef Raskin*, who created the concepts that underly SwyftCard and
its implementation, founded information Appliance, and who is now Chairman and
C.E.O. of the company.
*An asterisk marks a founder of Information Appliance Inc.
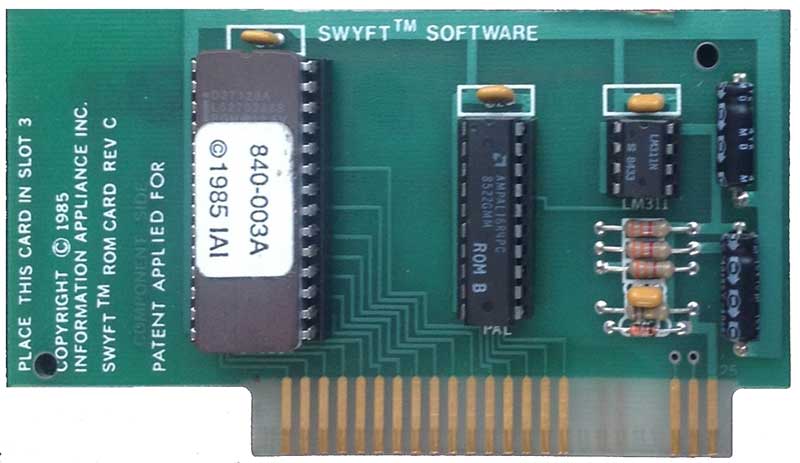
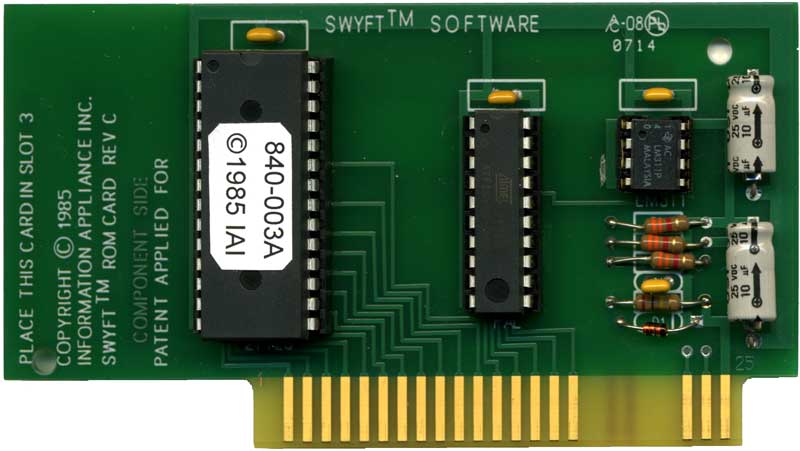
The Reproduction SwyftCard
If you want to build a SwyftCard using an Apple II prototyping card check out http://willegal.net/superproto/index.php?title=Swyft_Card.
System Requirements
- Apple IIe (rev B or later)
- 80-column card
- SwyftCard (slot 3)
- single 5 ?” disk drive (in slot 6)
Parts List
- Printed Circuit Board
- 3x 3.3K 1/4 watt resistors (orange orange red)
- 100K 1/4 watt resistor (brown black yellow)
- 1n4148 diode
- 28 pin socket
- 20 pin socket
- 8 pin socket
- 4x .1uF decoupling capacitors
- 2x 10 uF electrolytic capacitors
- LM311 voltage comparator (8 pin DIP package)
- 16R4 PAL or 16v8 GAL programmed with SwyftCard hardware equations (20 pin DIP package)
- 27C256 or 27C128 EPROM programmed with SwyftCard software (28 pin DIP package)
Assembly Instructions
Make sure you can tell the difference between the component side and the
back of the PCB. All components are mounted on the component side of
the PCB. Using Ohm-meter check power and ground planes to make
sure that there is no short circuit.
- Bend leads of 100K resistor to match hole spacing on board
- Insert into board and bend protruding leads outward a bit to hold in place
- Solder 100K resistor onto board and cut off protruding leads
- Repeat this procedure with the three 3.3k resistors
- Find the end of 1n4148 diode with the black stripe - this end must go to right side of board
- Orienting correctly, using same procedure as resistors, soldering into place
- Find pin 1 end of 28 pin socket - this end normally has a cutout
that doesn’t exist on other end. Pin 1 end sometimes may be marked
“1”
- Insert into position with pin 1 toward top end of board and solder only the 2 corner pins
- Check that socket is seated fully into board
- Solder remaining pins
- Repeat procedure for 20 pin socket
- Repeat procedure for 8 pin socket
- Insert .1uF caps into holes and bend leads slightly outward to hold in place
- Solder into position and cut off leads
- Find positive end of 10uF electrolytic capacitors.
This end usually has a grove in package. The positive end of the
electrolytic capacitors supplied with kits is indicated by the
arrows/plus sign. The positive end must be oriented toward
top of board. Orienting correctly, using the same procedure as
with resistors, solder into position and cut off leads
- Repeat the check for shorts between power and ground
- Check for solder shorts or bad solder joints
- Using isopropyl alcohol, clean resin from back side of board - rinse off with water and let dry
- Finding the cutout at the end of the LM311 package that indicates the pin1 end
- Orient correctly and insert into 8 pin socket. If pins don’t fit
well, you can bend them in a bit to make insertion into socket easier.
- Repeat for 20 pin PAL/GAL IC
- Repeat for 28 pin EPROM IC
- Check to make sure that there are no bent under leads on the ICs
- Power off your computer and carefully plug the SwyftCard into slot 3
- Turn on your computer and you will be running the SwftCard system
SwyftCard Mini User Guide
| Keys |
Description |
|---|
| ESC | Ends page - starts new page – Sends an ESC after a CONTROL-Z |
| TAB | LEAP again when used in conjunction with an APPLE key. Tabs if pressed by itself. Tab stops in columns 5.10.15…75 |
| RETURN | Ends line - starts new line |
| CONTROL | Is used with certain keys to give SwyftCard commands |
| DELETE | Deletes whatever is highlighted. DELETE operates to the left after typing - to the right after leaping or creeping |
| OPEN-APPLE | Is held down while you type a pattern to which you wish to have the cursor LEAP. Will “creep” backward if typed |
| SOLID-APPLE | Is like “LEAP BACKWARD” but the search goes forward through the text. Will “creep” forward if typed |
| RESET | If the system is not responding - hold down CONTROL and tap the RESET key to resume normal operations |
| Selecting Text |
|---|
| Cursor | The blinking “cursor” shows where the next letter will appear when you type |
| Highlight | The unblinking “highlight” is usually alongside the cursor and shows what will be deleted if you press the DELETE key |
| To Highlight | Move the cursor from one end of the chunk to the other and press both APPLE keys down at the same time |
| Extend Highlight | You can move the cursor after highlighting by “creeping” with either APPLE key |
| Re-Highlight | Hold down both APPLE keys together |
The following keys perform the indicated SwyftCard command when typed while you hold down the CONTROL key.
| Control-Key Function |
|---|
| CNTL-A | INSERT - inserts the last chunk of text that was DELETED |
| CNTL-D | SEND - transmits the highlighted text via the super serial card |
| CNTL-G | CALCulate - evaluates or executes the highlighted text as a BASIC program |
| CNTL-N | PRINT - delivers the highlighted text to the printer interface |
| CNTL-L | DISK - directs the disk to do the appropriate disk operation |
| CNTL-Z | Sends next key press as a control character to super serial card |
Underlining
To create underlines in text that will be printed, place an
underline character instead of a space in front of the word or words you
want to underline. Then place a second underline character after
the word or words you want to underline to indicate the end of
underlining. Enter three underline characters in a row to indicate
a single isolated underline. Two return characters in a row will
turn off underlining.
Disk Operations
Whenever you place a disk in the drive, use the DISK command
(CONTROL-L). Before you take it out, use the DISK command.
To force a disk to load, DELETE the entire text and enter the DISK
command. When you change from one disk to another, anything
highlighted on the first disk will be automatically inserted onto the
second disk: To clear a disk irreversibly, type and highlight CALL 3600
and use the CALC command. This is dangerous, and should be used with due
care.
Calculations
The CALC command sends the highlighted text to the Applesoft BASIC. Programs over 20 or so lines long may not work.
Documentation Note
In original SwyftCard documentation, the following keys are given unique Swyft software names.
CONTROL = FRONT
OPEN-APPLE = LEAP BACKWARD
SOLID-APPLE = LEAP FORWARD
A pdf of the original documentation can be found here: http://apple2online.com/web_documents/swyftcard_manual.pdf
PDF file of Instructions
Download the PDF version of reproduction SwyftCard instructions.
Cheat Sheet
Download this PDF of an SwyftCard cheat sheet that I created.
Kits
Kits are $55 including shipping. To get detailed information regarding obtaining your own SwyftCard Kit, please send an mike@willegal.net
For More Information
Canon Cat User Group:
https://groups.google.com/forum/#!forum/canon-cat