Construction of the probe requires the following materials.
| Quantity | Description |
| 1 | 1 1/2 x 3 1/2 (2x4) piece of wood 3 inches long for light box. I used a scrap piece of red oak. |
| 2 | 1/4 x 1 1/2 x 3 1/2 pieces of wood for light box end covers. |
| 4 | Short wood screws to attach covers to light box. |
| 2 | Short lengths of 1/2 inch straight PVC. |
| 2 | 1/2 inch PVC 90 degree bends. The end of one of the elbows is a nice match for the 15 ml glass bottle cap. Look closely at the picture to see the difference on the end that attaches to the bottle. |
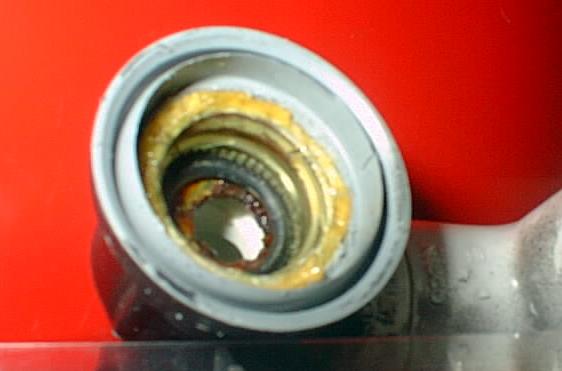
| 1 | 15 ml glass bottle with top. I have seen these in the vitamin section of the drug store. |
| 1 | O-ring, should fit nicely into the cap of the 15 ml bottle. Available in the plumbing section of a nearby hardware store. |
| 1 | Empty plastic film container. Found with 35 mm film. |
You will also need the following tools for construction.
| Quantity | Description |
| 1 | 2 piece epoxy for general purpose applications. Look for the stuff in the twin dispenser tubes. |
| 1 | 1/4" drill bit for drilling holes for LED and photo resister holes in side of light box and to also open bottle top. |
| 1 | Drill bit for drilling pilot holes for light box side cover. |
| 1 | Screwdriver. |
| 1 | Drill. A drill press will make it easier to make the main hole for the bottle in the light box. |
| 1 | Black spray paint. |
| 1 | Saw to cut PVC pipe. |
| 1 | Utility knife to cut film canister. |
| 1 | PVC solvent and glue. I think the 2 piece epoxy would work in place of this, if you want to try it. |
| 1 | Wood chisel. |
| 1 | Sanding drum for sizing the main cavity. |
| 1 | 1" forsner drill bit for drilling the flat bottom hole to hold the 15 ml bottle. |
Cut a piece of straight PVC pipe short enough so that it will work as
a connector between the two elbows. Glue the other straight
piece into the end of the standard elbow. This piece will extend
down into the aquarium water. Do not make it too short. If
you initially make it too long, you can always cut it down later on.
Cut a hole into the film canister top, so that the bottle cap fits nicely into it. The lip on the bottle cap should form a seal with the film canister cap. The film canister cap material is hard to cut, and don't worry too much about perfection. Drill a decent sized hole in the center of the 25 ml bottle cap to allow air exchange with the aquarium water. Using the 2 part epoxy, glue the two caps together and to the pvc pipe. This connection should be air-tight to get accurate readings.
When it dries you should be able to add the O-ring and screw the 15 ml bottle into the pipe and hang it on your tank as a visual PH monitor. This is what I have been doing for the last couple of years. Actually, if you are going to do this, you can omit the film canister top. I have been using aquarium pharmaceuticals PH test kit for the last couple of years. The kit is set up to test 5 ml samples with 3 drops of test solution. I use 9 drops of solution in the 15 ml bottle. I seems to remain accurate for a very long time, although you can simply unscrew the bottle and refill during periodic water changes, if you wish.
Now, if you are going to make an electronic PH controller you need to construct the light box. The light box consists of the upper 1" of the film canister body mounted into the top a of cavity drilled into a block of wood. First make a hole in the wood block that is just big enough to fit the body of the 15 ml bottle. My bottle required a hole just bigger than 1". I drilled the main hole with the 1" forsner bit about 2 and 3/8" deep. I then used a small sanding drum on a drill press to enlarge the hole so the bottle would bit nicely into it. Next you need to cut off the bottom of the film canister so that about 1" of the top portion is remaining. I enlarged top portion of the hole in the light box so that the top portion of the film canister would fit snugly into it, leaving about 3/8" protruding above the top. Glue the top part of the film canister into the enlarged hole. You should now be able to test the assembly of the light box to the pipe portion of the sensor. Screw the 15 ml bottle into the pipe. Then attach the top of film canister to the portion glued into the light box.
To fit the electronic components, you need to drill a single hole through
one side of the light box to the center cavity and back out the other side.
The hole should go through the center cavity below the bottom of the film
canister. Also make sure you drill though the long ends. This
hole will contain a green led on one side of center cavity and a photo
resister on the other side. You will aim the LED on one side of the
center cavity at the photo resister on the other side. The LED and
photo resistor I used fit nicely into a 1/4" hole, so that is what I drilled.
I used a piece of 4 conductor telephone wire to connect my probe to the
electronics portion of the project.
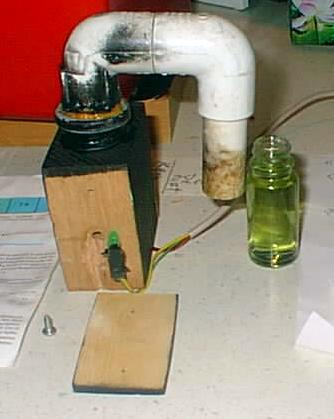
For best performance, paint interior surfaces of the light box, black, to absorb stray light. The outside can be painted any color you please. You have now completed your PH probe.
Back to Mike's Hobby Home Page