The old mac is dead, long live the mac

It was actually a 2002 model, 1.25 GHZ dual processor MDD tower. I loved that machine, it really only started showing it’s age in the last couple of years. That machine lasted longer as my main home machine than any other I’ve had. Other contenders:

  • The next was a IIci which lasted about 7 to 8 years. The IIci was also my most expensive computer purchase – about $5000 including grayscale monitor and video card.
  • My MAC 128K lasted about 6 years (including a number of upgrades up to MAC plus)
  • I wonder if Apple will be releasing new Imac models tomorrow?

    old (but not vintage) mac woes

    My 8 year old Mac G4 crashed last night and refused to reboot. Took all normally recovery measures (resetting PRAM, etc) and still no go. Took every removable component off and still no go. Power supply measured correct voltages. Was suspicious of motherboard/CPU. re-seated everything else that I could get at (including CPU daughter card). Still no go.

    At this point, I was considering next steps – what computer to replace it with and how to move contents of hard drives forward, when I discovered an obscure way to reset open-firmware (which handles booting the machine) on Apples web site. It did the trick and I’m back in business. I’m a bit surprised that I didn’t break anything, giving all the fiddling that I did.

    Now to figure out what I was doing, when it crashed…

    Ask Permission, Credit Your Sources

    Long time visitors to my web site probably already know that when I post information and images on my website or blog, I always try to do two things.

  • Ask permission to post any proprietary/private information or images
  • Credit the source (as long as the source doesn’t desire anonymity)
  • There are many reasons for this approach and I’ll list them here in no particular order.

  • Asking permission is easy
  • I have never been turned down, though a museum once asked for a couple of hundred dollars for use of an image (I found an alternate source)
  • Adding credit is easy
  • People deserve credit for their efforts
  • Doing the “right” thing makes me feel good
  • Even a tiny piece of the historical record, needs source of facts documented
  • People are more likely to help you in the future, if you credit them in the present
  • Over the years, I have freely shared virtually all the information I have gleaned over the years about the many topics that I have investigated, from Tropical Fish to Vintage Computers. About the only time I withhold information, is if I think the data might reflect badly upon a living person, and would serve no other useful purpose.

    There have been several cases where I found weaknesses or bugs in the systems I have replicated. I have always published my findings, though in a couple of cases, it probably wasn’t necessary and I considered holding back. One example, is when I found a couple minor discrepancies between my rev 0 replica and the real thing. In the end, I decided to publish, even though it might reflect poorly upon my replication efforts.

    There have been a number of instances over the years where discoveries or information that I published on my web site has been used by others without giving proper credit. Most of the time, these cases are minor, and not worth bothering about. An recent example is when someone hijacked an image of Mimeo to use as an iPod cover. That “case” amused me more than anything, because there were plently of legit Apple 1 images that could have been hijacked, instead. A couple of recent cases involving a couple of different people have disturbed me a bit more than normal, which is prompting me to write this “editorial”.

    The bottom line is: ask permission and credit your sources. You’ll be amazed how a little bit of common courtesy will be paid back in a thousand ways.

    SCELBI memory

    The SCELBI 8H uses 256×1 bit MOS RAMs.

    Doing the math, it would take 134,217,728, 256×1 bit chips to equal the memory capacity of a modern 4 Gigabyte memory module. I don’t know production figures, but I strongly suspect that adding all the 256×1 bit memory chips ever made together into one system, would not equal the memory capacity of a single modern 4 Gigabyte module.

    Significant Updates to SUPERPROTO wiki

    The reference section has been significantly improved with following topics added:

  • Power and Ground Planes
  • Prototype Area for ICs
  • General Purpose Prototype Areas
  • Apple II Bus Access
  • Extending to a Bread Board for rapid prototyping
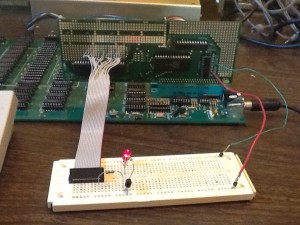
  • I’m particularly excited about the breadboard section, as it opens up the Apple II to easy HW prototyping.

    SUPERPROTO connected to breadboard

    SUPERPROTO connected to breadboard

    A couple of years ago, James LittleJohn had offered a card (LittleProto II) with a breadboard built onto it. I think that the approach of a separate breadboard will allow you to easily work on your design, then when you feel that it is solid, move it permanently to the proto area on the card itself. In fact, Jon Titus had published a book back in the old days, that suggested a similar scheme for hardware interfacing. The book is called “Apple II Interfacing”. I talked to Jon about updating and releasing a modified version of this book a few months back, but at this point that project is in limbo.

    Automobile design for serviceability

    After several years of being broken, I finally took the time to repair the remote starter on my 2004 Malibu.

    Based on internet searches, I had a pretty good idea that the problem was in the switch that detects whether the hood is open or closed. This switch is designed to protect anyone that is working under the hood from harm due to a remote start event.

    The first step of this job is to remove the hood latch, since the switch is integrated in with it. This wasn’t too difficult, but disconnecting the remote release cable was tricky and the connector for the switch harness was underneath a plastic bezel that couldn’t be removed. However one side of the bezel was bolted down. I unbolted it and pried the bezel up so I could get at the connector, which was underneath.

    I now had the latch out and examined the integrated switch, which was riveted on. Testing the the three leads coming off switch with an ohm meter revealed no connection, no matter what position the switch was in. I wondered if it could be fixed, so I decided to drill out the rivet and remove it from the latch assembly. Then I cut off the plastic rivets that held the sides of the case together to get a look inside.

    The mechanism was rather interesting, it held two sealed magnetic switches mounted on small PC board. One of the two switches was activated at any time by a magnet that moved with the latch mechanism. The sealed switches were defniately designed for the hostile environment at the front of my car. However, the weakness of the design was that traces on the PCB were exposed to whatever could get into the switches. They had corroded to the point of failure.

    Well I got out my soldering iron and soldered some wire where the traces were supposed to go. Then I attached the switch to the cars electrical system and sure enough, the remote starter came to life for the first time in a number of years.

    With the fix proven, I used crazy glue to put the switch case back together and attached the switch back to the latch with a small screw and nut, dropping a bit a glue on the exposed threads so it wouldn’t work loose in the future. I then reassembled everything and successfully verified the fix.

    Now what about the title. I have several complaints about this design in terms of servicability.

    Though removing the latch was not that difficult, it was made more difficult by the limited space available to access the three bolts holding the latch to the car. Getting under the plastic bezel to access the electrical connector was also a pain. Riveting this switch to the latch ensures that normal people will have to replace the latch with the switch, increasing cost of repairs by quite a bit.

    All in all this isn’t too terrible a repair job. It just took longer than it should have, because the overall design wasn’t optimized for serviceability.

    Mimeo 1 iPhone case spotted

    Mimeo 1 iPhone Case

    Mimeo 1 iPhone Case


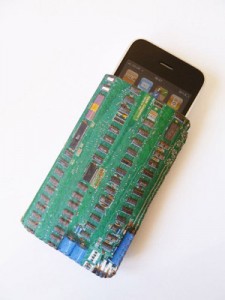
    I have nothing to do with this, other than the business stole the image off my website. This net thievery normally annoy’s me, but this time, I’m just amused. There are plenty of authenitic Apple 1 images floating around the web that could be stolen, instead of an image of a Mimeo 1.

    http://crankcases.co.uk/iphone-cases-2.html

    P.S. If someone asks to use an image or article, I almost always say, just credit the source and I’m fine with it.

    Mimeo 1 Availability in the Future

    Here is how I currently manage Mimeo 1 kit availability.

  • In order to keep costs down, I restock component parts only when I run low or completely out of parts. Number of kits available, depends upon if I just ran out of some component or another, and how low the inventory is of all the rest of the required components. Keep in mind that there are 69 different component types in a Mimeo, so I’m usually running low on something. I rarely have on hand complete part kits for more than 3 or 4 units at a time. Frequently I’m down to one or two kits of parts on hand. The good news is that most part types can be restocked within a month.
  • Even though the volume of kits sold is very low, this process is very time consuming. Just as bad for me, the effort required is very dependent on the frequency and timing of Mimeo 1 kit purchases. This makes it very hard to make consistent progress on new projects (like the Scelbi).

  • I would love to move to a batch system, but component availability is so erratic for some of the more hard to find components, that often I will jump on an opportunity to buy a cache of those components at a good price. This makes putting together batches of kits hard to do, since the size of inventory of the various component types is all over the map. Instead of making batches, starting next year, I’ll will probably be less aggressive about keeping Mimeo kits available, especially if I’m busy with a new project. So what I’m saying is that starting next year, Mimeo kits are just as likely to be out of stock as in stock. And they may stay out of stock for a while, if I’m busy trying to make progress on a new project.
  • Which Apple Interpreted Basic is the Fastest?

    While at the vintage computer festival, I had an Apple 1, an Apple II with integer BASIC and an Apple IIplus with Applesoft all up and running.

    At one point late in the afternoon on Sunday, I decided to have a simple performance contest between these machines. This is the program.

    10 FOR I = 0 TO 10000
    20 NEXT I
    30 PRINT “DONE”
    40 END

    Two machines were matched against each other and the program started at the same time on both machines. The first to finish was the winner.

    After several heats, here are the results.

    1st place – Apple 1 – by a little
    2nd place- Apple II
    3rd place – Apple II plus – way behind

    At first, I was confused by the Apple 1 beating the Apple II, as the Apple II should run about 5% faster than an Apple 1. This is do to the more efficient method for refreshing memory on the Apple II. The Apple 1 stops processor clocks while refreshing, while the Apple II uses unused portions of the 6502 bus cycles to refresh memory (and read video display data). Integer BASIC on the Apple II is a direct development of Apple 1 Basic, so I was thinking that the performance would depend on the processor, not the Integer BASIC implementation, which were basically the same.

    After a while I realized that Apple 1 BASIC might be a little simpler than Apple II BASIC and thus faster. I ran a second test. In this test, I booted the A2plus that I had there at the show into Apple 1 mode, with the Brain Board/WOZANIUM and ran the test against the original Apple 1. Both machines were now running virtually the same version of BASIC. In this case, the Apple II beat the Apple 1 by the expected amount. Thus, Apple 1 BASIC running on an Apple II, is the fastest version of Apple BASIC.

    However, keep in mind that if print statements are added to the loop, the Apple II will beat the Apple 1 by a substantial amount.

    Note on BB assembly, Version 5.1 PROMs shipped, and Why Is the BB Upside Down?

    For people that still had the FCS, 4.0 PROMs, version 5.1 PROMs were shipped on Monday and should be in your mailboxes soon. I will only be updating version 5.0 PROMs upon request. The only difference between version 5.1 PROMs and 5.0 PROMs, is in the power up screen and it doesn’t affect operation in any way.

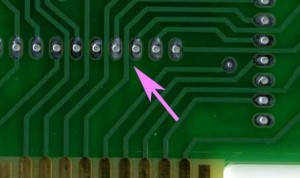
    Though assembly is really straight forward, there is one thing to watch out for when assembling Brain Boards. Where the traces run between pads, the soldermask reveal extends right up to the edges of the traces and, on some boards, where registration isn’t perfect, the solder mask reveal may expose a tiny part of the trace. There is potential here for shorting the trace to the pad when soldering a component to this pad.

    Brainboard-soldermask

    When soldering these pads, be careful that you don’t accidentally bridge the gap between the pads and the adjacent trace. If you can’t get rid of the bridge with a solder wick or solder sucker, the easy fix is to cut the solder bridge with a hobby knife. Check continuity with an ohm meter to make sure the connection is broken.

    Is the Brain Board Designed Upside Down?

    It’s funny that no one has questioned or commented about the upside down layout on the brain board. This was done on purpose because of the vastly improved layout possible with upside down chips. The layout of the address and data bus connections between the 27c256 and 74LS244 sockets and the edge connector would be much more complicated if the chips were right side up. Flipping the 27c256 right side up moves the data bus connections of the 27c256 to the opposite side of the chip from the 74LS244 and Apple data bus. Also, all the lower address lines would have to be crossed to properly connect the 27C256 to the Apple bus.

    Once I flipped the 27C256, I figured I had to flip all the chips and the silk screen to prevent confusion and mistakes during assembly.