How I came to be at the Homebrew/Apple Reunion, LCM+Labs, 2017

A few weeks ago, I was invited to a “Homebrew/Apple reunion event” at the Living Computer Museum and Lab. Here is some of the text from the invitation.

Living Computers: Museum + Labs, founded by Paul G. Allen, would like to invite you to a very special private event.

We are celebrating the opening of our latest exhibit, which follows the first 20 years of Apple Computers, by throwing a party for those who were there. This is a unique opportunity to reconnect to the people, and computers, that you remember from the start of the personal computer revolution.

I was given no additional information about who was coming or since I never worked for Apple Computers, even exactly why I was invited. However, without hesitation, I accepted the invitation, and made plans to attend.

Fast forward a few weeks, to just a few days before the event. Someone noticed a little reported article announcing that a very special Apple 1 was going to be on display at the LCM+lab’s new Apple exhibit and brought the article to my attention. This happened to be the computer that I reported in a blog posting a few years ago, though I never updated my Apple 1 registry with this unit. I didn’t think a whole lot more about it, as I have been involved in communications with many Apple 1 owners over the years.

I arrived in Seattle on Tuesday afternoon for the Wednesday evening event, still unsure why I was invited, and who else would be there. A small bus picked up about 8 or 9 of us from the Hotel late Wednesday afternoon to take us to the celebration. I could not identify anyone on the bus, though everyone was very friendly and in good spirits.

When picking up my name tag, I saw an impressive number of familiar names on the tags that hadn’t yet been claimed, including Woz and Paul Allen. Anyway, I introduced myself to a number of people and had some interesting conversations, including a chat with Lāth Carlson, executive director of the museum. However, I still was unsure why I was invited. I was taking the approach of “when in Rome, act like a Roman” – in other words, I was just trying to fit in and not ask too many questions.

After a bit, we were led through a behind the scenes tour. As we were watching the Bendix vacuum tube computer G-15 being demonstrated, someone that I didn’t recognize, saw my name tag and said “Mike Willegal is here”. The people identified themselves as the Hutmacher family and told me that they had donated the computer to the museum. The donation was kept a secret, which is why I wasn’t told anything. The Hutmacher family had asked the museum to invite me to this celebration, since, with the help of some acquaintances I had with early Apple people, I helped them verify the history of the computer and also pointed out that it belonged in a museum. The mystery of why I was there, was solved.

The fun part of being identified by the Hutmacher family is that they made a big fuss over me, and some of them had their pictures taken with me. During all this fussing over me, Chris Espinosa, who I had never met and only could identify by the name on his badge, looked on from the background with a puzzled look on his face. I could almost see his brain working – who is this guy that they are making such a fuss over. After the Hutmacher family moved on, I introduced myself to Chris Espinosa and explained what had happened.

Lastly, kudos to the Hutmacher family, a very special group of people, for putting a very special Apple 1 into very good hands.

One of WOZ’s Wonder Powers…

Do to the acts of an extraordinary generous family, I was invited to a private gathering of micro-computer legends at the “Living Computer Museum” in Seattle, earlier this week. The gathering included a number of people that were involved with the Apple 1 while it was still based out of the Job’s home and others that were involved in the early days of the personal computer revolution. It was a gathering that, as long as my brain is functioning, I will never forgot. During this event, I learned several little stories and will share them in the coming days on this blog. Here is the first story.

While several of us were admiring the original Apple 1 that will be available to visitors to the museum to use, we discussed how it was being booted with the museum staff. Inevitably, the topic turned to how WOZ used to enter the 4K of BASIC object code by typing hex codes using the Apple 1 monitor. Several of the people there, said they witnessed him do it, and confirmed his amazing prowess at data entry through a keyboard.

Let me tell you, when I first built an Apple 1 clone, I tried to replicate the feat and gave up after screwing up a few hundred bytes worth of input. This was so difficult for me, that I found it hard to believe that it could be done. At the time, I sent an email directly to Woz to ask him about it. He responded that he did it all the time.

I can’t find any blog post that reported this exchange. I may have made one or perhaps, I was so dubious, that I decided to file the whole episode away. Anyway, hearing directly from a couple of eye witnesses has eliminated any remaining doubt and I’m rectifying any omissions in faith by making this post.

I can’t remember hearing about anyone else achieving this, but assume it’s possible. I’ll bet it’s not something that anyone else has done repeatedly. This is a difficult feat, and the fact that WOZ did it repeatadly makes it simply amazing.

PS/2 Adapter Software and Hardware CAD Files Now Available for Free Download

Go to my PS/2 adapter web page to find the links.

http://www.willegal.net/appleii/appleii-kb-int.htm

Support will be very limited. The firmware is actually rather sophisticated for what this device does. Understand that it is completely in assembler, and if you desire to make changes, it would be best if you were familiar with coding in assembler for micro-controllers.

Some scripts are included in the software package that are used to download the firmware, calibrate the built in RC oscillator and burn the fuses using a USB programmer called AVRdude. Fuses and EEprom must be programmed correctly or the micro-controller may not function correctly. The A version of the Atmel at tiny 2313 has not been tested. I have been using ATTINY2313V-10PU.

The CAD program I used to create the PCB is called Osmond PCB. I have also included GERBER and Postscript files. You must accept all risk associated with creating PCBs using any of these files.

End of an Era for Me

As look back at some of the blog postings I made during the early days of the Mimeo project, the excitement I felt, could be easily discerned. For better or worse, after nearly 7 years, that excitement is no longer there, and it’s time to move the project over to someone who has a strong passion for that landmark system.

I’ve transitioned Mimeo 1 sales to Corey Cohen. I’m sure he will do a great job selling and supporting people interested in building reproduction Apple 1 Computers.

Since first making them available in March of 2010, I’ve sold 167 Mimeo PCBs, the first few as part of a kit, even a few that were completely assembled and tested. I have greatly enjoyed the entire process from creating the PCBs in the first place, to fixing a few boards that customers needed help with. Especially gratifying, has been the great relationship that I have established with all the people that I have made contact with over the years. One thing that I never expected, when starting this project, was the amazing contacts I made with so many people associated with Apple during those early years.

However, the learning part of the process, which is one of things that keeps me interested in my hobbies, has not been there over the past few years. It is time to move the sales over to Corey, who has unbelievable enthusiasm and knowledge for and about those milestone computers.

SCELBI PCBS

I will continue to sell SCELBI PCBs, as I am still excited about working on that system and learning a lot, while doing it. Blog followers will know that the Oscilloscope Interface PCBs, the last SCELBI boards that need to be reproduced, will soon become available to interested parties. I have some ideas for some even more obscure reproduction vintage computer projects. However, the Oscilloscope interface must be completed, before I move on to those projects.

Other Products

Other products I have sold in the past, will only be continue to be sold if I have remaining inventory in stock.

I presently have stock of the following

  • Brain Boards
  • Swift Cards
  • I am sold out of the following:

  • Apple II, rev 0 boards
  • SuperProto boards
  • PS/2 keyboard adapters.
  • Datanetics Keyboard PCB
  • The PS/2 Keyboard Adapter

    The PS/2 keyboard adapter is a little bit of a special item to me. When I had those PCBs made, because of economies of scale, I had 150 fabricated. I never thought I’d sell all of them. In the end, I sold over 140 those little dongles, using the others for a number of my own special projects. Though they probably exist, I have never heard of a PS/2 keyboard that it didn’t work with. It was designed to operate with Apple 1 and Apple II computers. As I originally hoped, people adapted the design to a number of systems beyond that. The firmware has had minor firmware features and improvements made over the years, but the basic design hasn’t changed over all these years.

    There have been a number of other PS/2 keyboard to parallel ASCII keyboard adapters designed over the years, some coming before, and inspiring my adapter. Though it could certainly be improved further, I sincerely believe my version is currently the best of the breed.

    When I get the time to add them to my web site, I will be releasing to the public domain, with no restrictions, all design files, including firmware and PCB CAD files. You will be able to do what you want with it, make copies for sale, improve it, or just study the design for your own purposes.

    Brain Boards – batch 2 now available.

    I now have a batch of Brain Board kits ready to go.

    For kits sent to the US – send $59 per kit to my Paypal account (at end of this email)

    For kits sent internationally – send $59 per kit, plus $10 postage (combined shipping for all kits) to my Paypal address (at end of this email)

    For those that want to build and test the kits add $25 per kit built and tested.

    Shipment should occur within a few days, except for those that want me to build and test – expect a week or so before shipment.

    My PayPal address is: (mike@willegal.net)

    Make sure you include your shipping address with Payment.

    thanks and best regards,
    Mike Willegal

    PCB and kit stocking status

    I now have everything that I normally stock on hand – except SCELBI front panels.

    I was a bit behind on things, but today I shipped a few items that I owed people, so am caught up, with the exception of those SCELBI front panels.

    In addition, due to popular demand, I made a new run of Brain Board kits. I tested an example earlier in the week, and except for a bad 74LS74 IC, I found they work fine. I’ll have to go through my stock of 74LS74’s and test them before finishing putting together kits. With luck, I’ll have kits ready to ship by next weekend. Watch for an update in the next few days before sending money.

    The Great American Prob. Machine

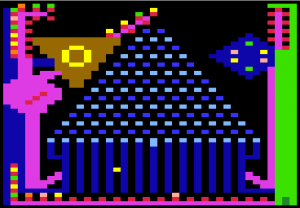
    A few days ago, I was searching through my small personal archive of Apple II floppy disk images, looking for an Apple II clone of Colosal Cave. As fate would have it, among those images, I ran across a program called “THEGREATAMERICANPROB.MACHINE”. Vaguely recalling it being a fun program from the “old” days, I started up an Apple II emulator, loaded the DSK image and ran the program. Here is a screen capture

    GREATAMERICANPROB.MACHINE

    GREATAMERICANPROB.MACHINE

    and a movie of the program in action.

    GreatAmericanProbMachine

    Just as I sort of remembered, it was a pretty cute Apple II low res color graphic animation. However, when the credits rolled, I discovered something totally unexpected. It was written by none other than Bruce Tognazzini. Tog, as he is now known, is now a respected authority on user interface design.

    Having had a brief email interaction with Tog a few years ago, and knowing he was quite approachable, I decided to send him a message. I let him know that this old work wasn’t forgotten. I figured that he would appreciate that. The response I recieved, had some quite unexpected news. Here is Tog’s reply.

    Thanks. It was when Steve Jobs saw that program that he decided to hire me. It was the first ever full-screen animation done on the Apple II.

    I sent him another message thanking him for his reply and asking him if he minded if I shared it on my blog. He responded with more details about how “THEGREATAMERICANPROBMACHINE” helped get him hired at Apple.

    Not a problem. Specifically, I took a piece of code I’d written that added a new command to Integer BASIC down to Apple to show Steve. After selling him on that, he asked me what else I had done. I showed him the Probability Machine, throwing it up on Apple’s large-screen Advent projector. He got really excited, left the room, and gathered up everyone he could find in the building. (Apple was still all in a single building in those days.) I was quite surprised it caused so much excitement; I had no idea I’d pulled off something that, at the time, was a breakthrough. A week or so later, Jef Raskin called me up and said that Steve thought we should talk. I assumed he was going to want to buy some more of my software. It turned out, he and Steve wanted me,

    -tog

    Using an Apple Powerbook as a Cassette Tape Recorder

    During my debug of the SCELBI cassette tape interface, I decided I needed to get better visibility to the actual output of the cassette interface. There are a couple of ways to do this. One way was to use a DSO (digital storage oscilloscope) or logic analyzer to capture and analyze the signal. I don’t have either, so I had to resort to a second method. That is to capture the cassette output as an audio clip using an audio recorder and editor on a personal computer. One such application is Audacity, which is a free download.

    The only trouble with using a modern personal computer is getting the audio clip into the PC. Apple Powerbooks include a headphone port that includes speaker out and microphone in. Wendell Sander has an Apple 1 site that includes directions on connecting an Apple 1 to an iPod’s headphone port. I did a bit of research and determined that the Powerbook headphone port is basically the same.

    I constructed a dongle based on Wendells directions and hooked it up to an Apple IIe for testing. Unfortunately, I found that the Powerbook didn’t recognize the microphone input. After some more web searches I found a couple of sites that indicated that a 1600 ohm resistor between microphone in and ground would cause the microphone to be recognized. I hooked up a 1500 ohm resistor and found that it worked most of the time. The next larger size resistor in my stash was 2K ohms, so I switched to that and found that it worked reliably. I tested with the Apple IIe and found I could read and write reliably. I also decided to add a .1 uF capacitor on the microphone input line to decouple it.

    I next switched to the SCELBI to capture the output of the SCELBI write card. This proved very helpful and with the help of the Audacity audio editor, I was able to zero in on the problem I was having. During the examination of the SCELBI cassette signal I noticed that the high frequency tone was greatly attenuated. This was due to the .33uF capacitor suggested in Wendell’s notes. The SCELBI uses much higher frequencies than the Apple. I needed to change the capacitor to .01uF so it didn’t attenuate the 2700 Hz high frequency signal used in the SCELBI cassette interface. The resulting circuit is depicted below.

    powerbook cassette adapter circuit

    powerbook cassette adapter circuit

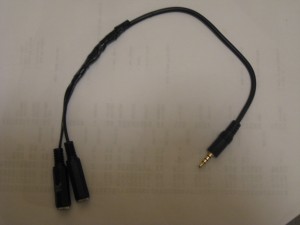
    Here is a picture of the dongle. Note that I took a 4 conductor patch cord and cut it in two for the plug end. The reason is that the small clearances in 4 conductor plugs are difficult to solder cleanly. It was much easier to cut the wire and solder the wires and components together.

    Powerbook Cassette Interface Dongle

    Powerbook Cassette Interface Dongle

    And here is a screen shot of the Audacity application showing a piece of SCELBI cassette audio out. The higher frequency portions represent ones, and the lower frequency are zeros. It takes 2 cycles of low frequency or 4 cycles of high frequency to represent a single bit. This encoding method is called frequency shift keying or FSK.

    SCELBI Cassette Clip

    SCELBI Cassette Clip

    Apple II TTY Emulator Fixed

    My previous posts described some barely working attempts at using an Apple IIe as a teletype replacement. When faced with bringing up my SCELBI cassette interface, I decided I needed to improve the Apple II based TTY emulation system.

    After spending about a week of my spare time focussed on this effort, I think I succeeded pretty well. The hardware interface hasn’t changed from that previous post, but the TTY emulator now supports the standard SCELBI TTY software and hardware really nicely with full 72 columns and 24 lines. Most of that time was spent trying to overcome what appears to be a glitch in the hardware serial start bit detection.

    Except for the initialization routine, I bypassed the Apple monitor character out functions and ended up writing my own output functions. Control characters behave like the SCELBI MEA application package expects them to behave. With the full screen now available, the new TTY emulation software is much more pleasant to use than the previous version.

    I didn’t implement a cursor. Some people may feel this is a shortcoming. While a cursor would be pretty easy to implement, I decided that a real TTY didn’t have a cursor, so my emulator shouldn’t need one, either.

    If you are interested, the source code can be found at this link:http://www.willegal.net/appleii/ttyemul-fs.asm

    While working on this, I found one little issue with the MEA memory dump command. When dumping a full line of memory contents, it attempts to print a space character in column 73 of the TTY. I’d guess that a real TTY would just refuse to advance the carriage in this event. If you know how they really work, let me know.

    I’ll need to port these changes over to my RTTY application, so it can also use a full screen. It’s not directly usable, because the RTTY runs at 45 baud and uses Baudot, instead of 110 baud ASCII. In any case, the RTTY port will have to wait, as next up on the to do list, is to check out the SCELBI cassette interface cards, which are built and waiting.

    Captain Crunch’s Memory Modification

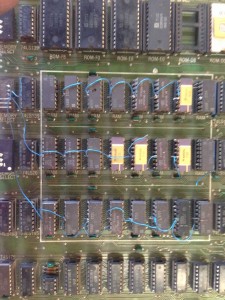
    After I received the original snap shot of John Draper’s Apple II, I asked for and received better images. Here is one of them, showing the unusual Apple II memory arrangement.

    Crunch's Memory

    Crunch’s Memory

    If you look closely, you will notice that all the memory banks are double stacked, largely with Signetics 2660 chips. These chips are 4Kx1, compatible with 4096s. This gives this system 24K of memory in 6 banks of 4K on each bank. Though I’ve seen double stacked memory on other systems, occassionally even on production boards, I’ve never seen this on any Apple II. Everyone else, managed to find 16Kx1 DRAMs and used those to expand their systems memmory. Don’t get me wrong, 16K memory chips were not cheap, especially in the early days of the Apple II. In fact for a long time, I ran my original Apple II with 2 banks of 16K and 1 bank of 4K for a total of 36K, which is all I could afford. I do believe John Draper’s approach is truly a unique solution to expanding memory for the Apple II.

    What is more remarkable is this article, where John Draper, Capt. Crunch talks about his Apple II.

    http://www.webcrunchers.com/crunch/Play/comp_rev/charlie.html

    John mentions his Apple II memory configuration in the second paragraph, “My apple used the cheaper 4k rams and I piggy backed them to get 24k of ram.”

    At some point, I plan on reviewing the wiring to see exactly how John wired up the 6 banks of memory.

    I have more information on this system to post in later blog entries.