CV Programming Software
Soon after purchasing my NCE DCC system, it became clear that some programming
track software would greatly enhance programming the decoders I put into
my locomotives.
-
Implementation Details
I choose to write this software in Java to increase portability across
different systems. Included on this web site is a demo applet that may
be run from your web browser. It is unlikely I will go through the trouble
of creating a working version that can be run from a browser because of
the complications involved in working around the browser security features
that prevent access to the file system and I/O ports of your computer from
a Java applet.
-
Host Computer Requirements
The target computer system will need a Java Runtime Environment and
Java's CommAPI extension installed in order to run. Both of the software
packages can be downloaded free of charge for various operating systems.
See instructions on this and the download page for more details for both
Windows and Macintosh.
I have tried this program on Windows NT, Windows Millennium, Macintosh
OS 9.04 and Solaris systems so far. Let me know if you get this program
running on other systems.
-
Target DCC Systems
Right now I have only programmed the software to talk to my Powerhouse
Pro system, but it should be easily adaptable to other DCC systems. I would
like to make this program also operate with Lenz, EasyDCC and Digitrax.
At this point I know little about the Digitrax and the Lenz systems serial
interfaces, but supporting the EasyDCC system should be a fairly easy addition.
Send
Email if you are computer literate,
have a Lenz, EasyDCC or Digitrax system and would like to work with me
in getting this program to operate on your system.
-
Install Tips for Windows O/S
These instructions are for Windows, but other platforms may require
similar techniques and processes.
I have been unable to run this program from the jre provided by Sun
for some reason, so load the java software development kit (sdk) from this
site at sun, instead.
http://java.sun.com/products/jdk/1.1/download-jdk-windows.html
Go towards the bottom of the page to where it says -
"Download JDK 1.1.8_008 Software for Windows 95 / 98 / 2000 / NT 4.0
(Intel Platform) "
and click on the button. On the next page read the license agreement
and click "accept" if you agree. On the next page click on the "FTP download"
button for a location close to you. Select the folder into which the download
will go and download the application using "windows explorer", go to the
folder into which the file was downloaded. Double-click on the downloaded
file follow the prompts given in the install program to complete installation
of JDK1.1.8.
Get the java comm package from sun at the following link -
"http://java.sun.com/products/javacomm/
".
Select the windows version and click on the "continue" button. Read
the license agreement and click "accept" if you agree. Click on FTP download
to download the install package. Select "open" and the install package
will automatically start up whatever program you may have installed on
your system that can extract winzip files. For instance, from winzip select
extract from the menu system in the dialog select "All files" and the destination
folder. In this case I saved the package into the following location)
"C:\Program Files\JavaSoft"
Copy certain commapi files to where they need to belong.
cd c:\program files\javasoft
C:\>copy commapi\win32com.dll jdk1.1.6\bin
Copy comm.jar to your <JDK>\lib directory.
C:\>copy commapi\comm.jar jdk1.1.6\lib
Copy javax.comm.properties to your <JDK>\lib directory.
C:\>copy commapi\javax.comm.properties jdk1.1.6\lib
Now download the railroadprogram applet using the same method as used
to get the java comm package. In this case I created a new directory in
which to put the application called "c:\Program Files\JavaSoft\railroad"
You have now installed all necessary elements onto your system to run
RailRoadProgram.
Follow directions on this page
to setup class paths and run the program
-
How To Use This Program
These screen snap shots show the highlights of the user interface.
The text will give some hints on operation.
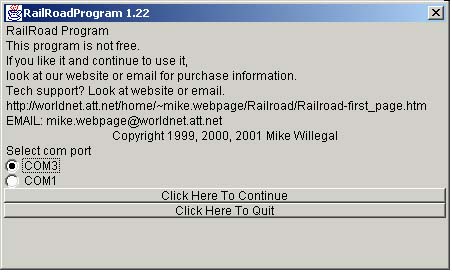
 When the full program is run it will prompt you to select the com port
that you have connected to your powerhouse pro command station. This dialog
does not appear when running the demo applet, since the demo does not access
any of your PC's hardware.
The operator configures a specific decoder type by selecting the decoder
in the Decoder menu at the top of the RailRoadProgram window.
The operator configures a decoder CV's in logical groups called screens.
Use the screen menu at the top of the RailRoadProgram window to select
the screen of interest.
Version 1.22 supports the following screens.
-
Basic - CV's common to most decoders (such as addresses and CV29) and CV's
that don't fit into other groups (such as user data).
-
Consist - CV's associated with consisting.
-
Lighting - CV's associated with lighting functions.
-
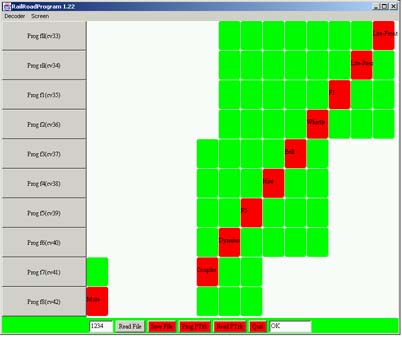
Output Map - CV's 33 to 42 - mapping of functions.
-
Steam Sound - CV's associated with SoundTrax sound functions.
-
Speed Curve - CV's associated with speed curves.
The Basic, Consist, Lighting and Steam Sound screens all have a similar
look and feel, which is described in the next section.
Use the check boxes, radio buttons, and integer fields to setup CV
values for programming. The actual CV bits affected are indicated by the
description attached to the button or textbox.
Clicking on the "Prog" button next to each check box, radio button or
textbox will cause only that specific value to be programmed to the loco
on the main track. This is known as ops mode programming. The loco is selected
by the loco number at the bottom left hand corner of the window. Programming
on the main track is fire and forget. There is no way to have this program
verify results without placing the loco on the programming track to read
back the CVs. To read the CVs or program on the programming track, use
the buttons at the bottom of the screen described next.

The "Read PTrk" and "Prog PTrk" buttons at the bottom of each screen
will either read or write the current screens CV's to a loco on
the programming track. Remember these buttons only affect the CV's for
the current screen. Note that when reading the CV's the program will read
manufacturer and version number and attempt to configure itself automatically
for the actual decoder detected. If the program cannot determine exact
decoder type, the user must select the decoder through the decoder menu
described previously.
The "Read File" and "Write File" buttons will write the programs current
values for all CV's to the file named by the loco number in the textbox
on the bottom left corner of the window. Note that the program assumes
default values for all CV's until either modified by user input or by reading
the CV's from the programming track. These buttons affect all CV's for
the current locomotive, not just the ones for the current screen.

The Output Map screen is a little different that the other screens.
It consists of a series of red and green squares that indicate which functions
affect which outputs. Red indicates an output feature is affected by a
function, green that it does not. For example F8 could affect the Mute,
Coupler, Dynamo and F5 outputs of a SoundTrax's steam decoder. In the screen
depicted here, only the Mute function is enabled to be affected by F8..

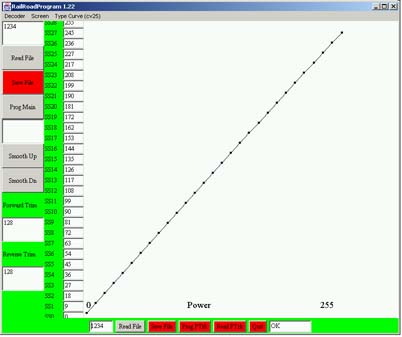
The speed curve can be altered through several mechanisms. Values can be
entered directly into the boxes along the left side of this window. The
values can also be altered by dragging the small black squares on the curve
itself left or right. The violet and blue lines show previous curves that
have been loaded into this screen. The last two curves are maintained as
reference in this way.
"1234" - A loco address can be entered into the textbox.
"Read File" - This button reads speed curve from the file "loco_address.spd".
Loco_address is the loco address entered into the textbox in the upper
left hand corner of the screen. This allows fetching speed curve information
from a speed curve file without altering other CV's.
"Save File" - This button writes the speed curve to the file "loco_address.spd".
Loco_address is the loco address entered into the textbox in the upper
left hand corner of the screen. Only the speed curve information is saved
into this file, information pertaining to other CV's is omitted.
"Prog Main" - This button will write the contents of the speed curve
to a loco the main. This is also known as ops mode programming. The loco
is identified by the address entered into the loco address box on the upper
left hand corner of the screen. Programming on the main is pretty much
fire and forget, there is no way to have this program verify results without
placing the loco on the programming track to read back the speed curve.
If the selected decoder supports forward and reverse trim, they are also
programmed at this time.
"Smooth Dn" - Helps you to create a smooth speed curve by smoothing
the curve, rounding down results.
"Smooth Up" - Helps you to create a smooth speed curve by smoothing
the curve, rounding up results.
-
Future Features
Here is a list of some in the order of likely implementation. If enough
folks are interested in this application, it is much more likely that I
will be motivated to continue to add features.
-
support for more specific decoders
-
locomotive operating controls
-
printing of save configurations
Send email, if you have more suggestions
on other features or decoders you wish to have supported.
-
Run The Demo
You will need a fairly new browser because of the JAVA 1.1 features
I have used in this implementation. In fact, I only recently got this demo
to start on Netscape for Macintosh, by downloading Nescapte version 6,
but there are still issues with accessing the menus. The full version does
work fine on a Macintosh, though.
This demo only shows the user interface and will not actually talk to
a command station or save the configuration values to disk. You can setup
all parameters like you were about to program them. Also you can drag the
speed curve settings by clicking on the little squares on the curve. Note
that the previous setting shows up as a colored line on the graph. Use
the smooth buttons to smooth out your curve. This demo is the exact same
program as the operational version, only the command station and file system
interface have been disabled.
Start RailRoadProgram Demo
-
You Have a Powerhouse Pro and Want This
Software Now
The assumption is that you tried the demo applet on this web site and
think you may like to use to operational program. You will also need a
working cable that connects from your host computer to your command station.
You can use any terminal emulation program to verify that the connection
works.
This version of the program is free, but if you do try it out, send
email and let me know what you think
about it and the ways in which you think it could be improved.
Download RailRoadProgram


